Love this? Save it for later!
Share the inspiration with your friends
It was 11:47 PM on a drizzly Wednesday in mid-October, and I had a bag of candy corn staring at me from the counter with what I can only describe as judgmental eyes. I was supposed to be making a fancy Halloween dessert for a neighbor’s party the next day—something with layers and piping bags and probably a trip to the craft store I did not have time for. But honestly? I didn’t have the energy for a complicated cake. I didn’t have the patience for fondant. What I had was a tired brain, a stick of butter that was finally at room temperature, and a sudden, slightly unhinged vision of a giant cookie dressed up like it was going to a haunted ball.
So I grabbed my biggest cast iron skillet—the one I usually reserve for deep-dish pizzas and questionable life choices—and I started throwing things together. Butter, sugar, a splash of vanilla that may have been a little more than “a splash.” I was in full chaos mode, but the kind of chaos that somehow works. I figured I’d just make a giant chocolate chip cookie, drizzle some ganache on top, and call it a night. But then I looked at that ganache, and I thought… what if it had legs? What if it looked like something that crawled out of a cauldron and decided to stay for dessert?
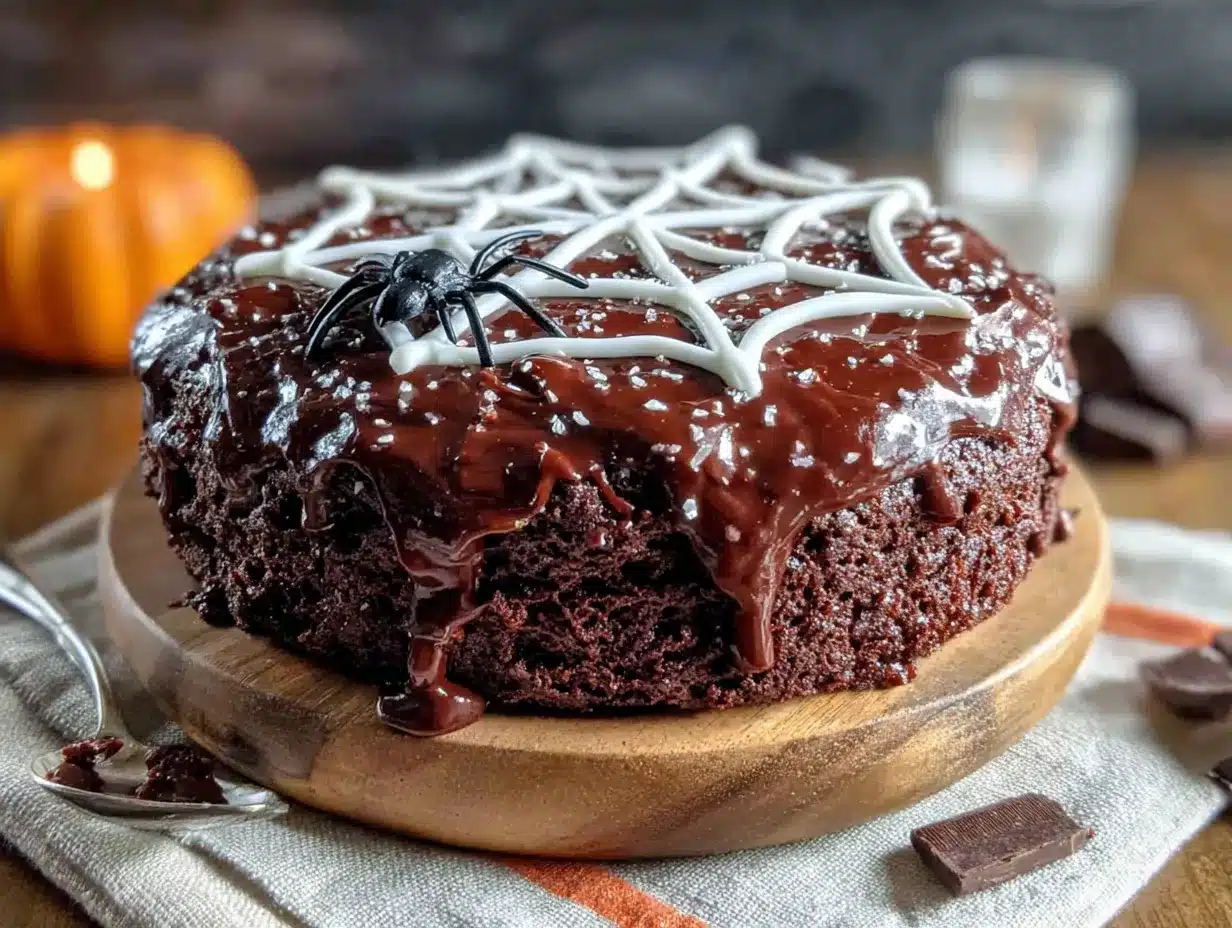
That’s how this spooky spiderweb Halloween cookie cake was born. Let me tell you, I walked into that party the next day with this thing on a cake stand, and people actually stopped mid-conversation. One kid asked if it was a real spiderweb. I told him yes, and that I had trained the spider myself. He believed me for a solid three minutes. That’s the kind of magic this cookie cake creates. It’s dramatic, it’s delicious, and it’s so much easier than it looks—which, if you’ve ever had a Pinterest fail at 11 PM, you know is exactly what you need.
Why You’ll Love This Spooky Spiderweb Halloween Cookie Cake
I’ve tested this recipe about seven times now. Not because I had to, but because I kept finding excuses to make it. I brought it to a Friendsgiving, a book club meeting, and once just because it was Tuesday. Every single time, people asked for the recipe before they even finished their first slice. That’s the kind of reaction that tells you you’ve got something special.
Here’s why this spiderweb cookie cake is going to become your new Halloween tradition:
- Quick & Easy: From start to finish, this comes together in about 45 minutes. No chilling the dough overnight, no complicated decorating tools. Just mix, press, bake, and drizzle.
- Simple Ingredients: You probably have everything in your pantry right now. Butter, sugar, flour, eggs, chocolate chips, and heavy cream. That’s it. No specialty baking supplies required.
- Perfect for Halloween Parties: This thing is a showstopper. It sits in the middle of the table and does all the work for you. People gather around it. They take photos. They argue over who gets the spiderweb center.
- Crowd-Pleaser: Kids love the spooky design. Adults love that it’s not overly sweet—the dark chocolate ganache balances the cookie perfectly. Gluten-free friends? Swap the flour. Dairy-free friends? Use vegan butter and coconut cream. Everyone gets a piece.
- Unbelievably Delicious: The edges are crispy, the center is soft and gooey, and that chocolate ganache on top is pure silk. It’s like a chocolate chip cookie and a brownie had a baby that decided to dress up for Halloween.
What makes this recipe different from all the other Halloween desserts out there? It’s the texture. Most spiderweb cakes are dry or crumbly, but this one stays soft for days. And the technique for the web—just a piping bag and a toothpick—is so forgiving that even if you mess it up, it still looks intentional. I mean, it’s a spiderweb. Imperfection is part of the aesthetic.
Honestly, this is the kind of dessert that makes you feel like a baking genius without actually having to be one. And let’s face it—that’s the best kind of recipe to have in your back pocket when Halloween rolls around.
What Ingredients You Will Need
This recipe uses simple, everyday ingredients to create something that looks like it came from a haunted bakery. Here’s everything you’ll need to make your own spooky spiderweb Halloween cookie cake:
For the Cookie Cake Base
- 1 cup (2 sticks) unsalted butter, softened — I prefer using Land O’Lakes for consistent results. Make sure it’s truly softened, not melted. You want it to be cool to the touch but give easily when pressed.
- 1 cup packed light brown sugar — This gives the cookie its chewy texture and deep caramel-like flavor. Dark brown sugar works too, but the cookie will be slightly darker and more molasses-forward.
- ½ cup granulated sugar — Adds a bit of crispness to the edges. Don’t skip it—the balance of sugars is what gives this cookie cake its perfect texture.
- 2 large eggs, room temperature — Cold eggs will seize the butter and make the dough lumpy. If you forgot to take them out of the fridge, place them in a bowl of warm water for 5 minutes.
- 2 teaspoons vanilla extract — Use pure vanilla if you have it. Imitation works in a pinch, but pure adds a richness you can taste.
- 2 ½ cups all-purpose flour — Spoon and level your flour. Scooping directly from the bag packs in too much flour and makes the cookie dry.
- 1 teaspoon baking soda — Make sure it’s fresh. If it’s been sitting in your pantry for two years, it’s time for a new box.
- ½ teaspoon salt — I use fine sea salt. It balances the sweetness and enhances the chocolate.
- 1 ½ cups semi-sweet chocolate chips — I like Ghirardelli for their melt quality. Reserve ¼ cup to press into the top of the dough for a prettier finish.
For the Chocolate Ganache
- ½ cup heavy cream — Full-fat is non-negotiable here. Low-fat or half-and-half won’t set properly.
- 1 cup semi-sweet chocolate chips or chopped chocolate bars — Use good quality. The ganache is only two ingredients, so each one matters. I’ve used both Ghirardelli chips and Guittard bars, and both work beautifully.
- 1 tablespoon unsalted butter — Optional, but adds a beautiful shine and makes the ganache extra silky.
For the Spiderweb Decoration
- ¼ cup white chocolate chips or melting wafers — These create the web lines. Melting wafers are easier to work with, but white chocolate chips taste better. Your call.
- 1 teaspoon coconut oil or vegetable shortening — Helps thin the white chocolate for smoother piping. Don’t skip this or your lines will be too thick.
Ingredient Tips: If you’re making this for a peanut-free household, double-check your chocolate chips. Some brands process peanuts on shared equipment. For a dairy-free version, use vegan butter, dairy-free chocolate chips, and full-fat coconut cream in place of heavy cream. The texture will be slightly different, but the flavor is still incredible.
Equipment Needed
You don’t need a fancy bakery setup for this spiderweb cookie cake. Here’s what you’ll need:
- 10-inch cast iron skillet or 10-inch round cake pan — A cast iron skillet gives you those perfect crispy edges and a rustic look. If you’re using a cake pan, spray it well with non-stick spray and line the bottom with parchment paper.
- Electric hand mixer or stand mixer — You can cream the butter and sugar by hand, but it’ll take a solid 5-7 minutes of elbow grease. I’ve done it. It’s not fun.
- Large mixing bowl — Glass or stainless steel works best. Plastic bowls can retain grease and affect your dough.
- Piping bag or small zip-top bag — For the spiderweb design. A zip-top bag with a tiny corner snipped off works just as well as a fancy piping bag. Trust me, I’ve used both.
- Toothpick or skewer — This is the secret tool for creating the web pattern. A wooden skewer works better than a toothpick if you have one—it’s longer and easier to drag through the chocolate.
- Cooling rack — Essential for getting the cookie cake to room temperature before adding the ganache. If you add ganache to a warm cookie, it’ll slide right off.
- Small microwave-safe bowl — For melting the white chocolate. Glass measuring cups work great here.
Budget-Friendly Tip: Don’t have a cast iron skillet? No problem. A 10-inch round cake pan from the dollar store works perfectly. Just add 2-3 minutes to the bake time since cake pans don’t conduct heat as efficiently as cast iron.
Preparation Method
Alright, let’s make this spooky spiderweb Halloween cookie cake. I’ve broken this down into clear steps so you can follow along without any confusion. Take your time, and remember—even if it’s not perfect, it’ll still taste amazing.
- Preheat your oven to 350°F (175°C). Position the rack in the center of the oven. If you’re using a cast iron skillet, place it in the oven while it preheats—this helps create those crispy edges. If using a cake pan, just set it aside.
- Cream the butter and sugars. In a large mixing bowl, beat the softened butter, brown sugar, and granulated sugar together on medium speed for 3-4 minutes until light and fluffy. Scrape down the sides of the bowl halfway through. The mixture should look pale and airy—this is where the texture magic happens. If it looks greasy or separated, you’ve overmixed. Stop and move on.
- Add the eggs and vanilla. Add the eggs one at a time, beating well after each addition. Then add the vanilla extract and beat until combined. The mixture might look a little curdled at this point—that’s normal, especially if your eggs were slightly cold. Don’t panic.
- Mix the dry ingredients. In a separate bowl, whisk together the flour, baking soda, and salt. This ensures the leavening is evenly distributed. No one wants a pocket of baking soda in their cookie cake.
- Combine wet and dry. Gradually add the dry ingredients to the wet mixture, mixing on low speed until just combined. Stop as soon as the flour disappears. Overmixing at this stage develops gluten and makes the cookie tough. A few streaks of flour are fine—fold them in by hand with a spatula.
- Fold in the chocolate chips. Reserve about ¼ cup of chocolate chips for the top. Fold the remaining 1 ¼ cups into the dough using a rubber spatula. The dough will be thick and slightly sticky—that’s exactly what you want.
- Press the dough into the pan. If using a cast iron skillet, carefully remove it from the oven (it’s hot!) and spray lightly with non-stick spray. Transfer the dough to the skillet or prepared cake pan. Using slightly damp fingers, press the dough into an even layer. Press those reserved chocolate chips into the top of the dough—this makes the cookie look bakery-fresh.
- Bake the cookie cake. Bake for 20-25 minutes for a 10-inch pan. Start checking at 18 minutes if your pan is smaller. The edges should be golden brown and the center should look slightly underdone—it will continue to set as it cools. A toothpick inserted in the center should come out with a few moist crumbs, not raw batter.
- Cool completely. Place the pan on a cooling rack and let the cookie cake cool for at least 30 minutes in the pan. Then carefully transfer it to the rack to cool completely. Do not skip this step. If you add the ganache while the cookie is still warm, it will melt into a puddle instead of forming a beautiful layer.
- Make the chocolate ganache. While the cookie cools, place the chocolate chips in a heat-safe bowl. Heat the heavy cream in a small saucepan over medium heat until it just begins to simmer—small bubbles around the edge, not a full boil. Pour the hot cream over the chocolate chips. Let it sit for 2-3 minutes without stirring. Then gently whisk until smooth and glossy. Stir in the butter if using. Let the ganache cool for 5-10 minutes until it thickens slightly but is still pourable.
- Pour the ganache. Place the cooled cookie cake on your serving plate. Pour the ganache into the center and use a spatula to spread it evenly to the edges. Let it flow naturally—you want some drips over the side for that dramatic effect.
- Create the spiderweb. Melt the white chocolate chips with the coconut oil in the microwave in 20-second bursts, stirring between each, until smooth. Transfer to a piping bag or zip-top bag with a tiny corner snipped off. Pipe a spiral starting from the center of the ganache and working outward, leaving about 1 inch between each ring. Working quickly while the ganache is still slightly warm, use a toothpick or skewer to drag lines from the center outward through the white chocolate rings. Wipe the toothpick clean between each drag for clean lines. You should see the web pattern emerge immediately.
- Set the ganache. Let the cookie cake sit at room temperature for about 30 minutes to allow the ganache to set. If you’re in a hurry, pop it in the refrigerator for 15 minutes. Just don’t leave it in there too long or the cookie will dry out.
Sensory Cue: When you drag the toothpick through the white chocolate, you should feel a slight resistance. If the ganache is too warm, the lines will blur together. If it’s too cold, the white chocolate will break instead of stretching. The sweet spot is when the ganache is still slightly tacky to the touch but not wet.
Cooking Tips & Techniques
I’ve made this spiderweb cookie cake enough times to know exactly where things can go wrong. Here are my best tips to save you from the same mistakes I made:
Don’t overbake the cookie. This is the number one mistake. A giant cookie cake continues to cook from residual heat after it comes out of the oven. If you wait until the center looks fully set, it will be dry and crumbly by the time it cools. Pull it out when the edges are golden and the center looks slightly puffy and pale. Trust the process.
Let the ganache rest. I know it’s tempting to pour the ganache right away, but patience pays off here. If the ganache is too hot, it will soak into the cookie instead of sitting on top. If it’s too cold, it won’t spread evenly. Wait until it’s warm to the touch but not hot—about the temperature of a nice bath.
Use a light hand with the toothpick. The first time I made the spiderweb, I pressed too hard and dragged the white chocolate all the way to the edge, creating a mess instead of a web. You want to barely skim the surface—just enough to pull the white chocolate through the ganache, not dig into it.
Room temperature ingredients matter. I learned this the hard way when I used cold eggs and ended up with a lumpy dough that baked unevenly. Take the eggs and butter out of the fridge at least an hour before you start baking. Set a timer if you have to. Your future self will thank you.
Multitasking strategy: While the cookie cake is baking, make the ganache and melt the white chocolate. That way, everything is ready to go as soon as the cookie cools. You can assemble the entire dessert in about 10 minutes of active work.
One more thing: If your white chocolate seizes up (turns grainy and stiff), you overheated it. Start over with fresh white chocolate and add the coconut oil from the beginning—it stabilizes the chocolate and prevents seizing.
Variations & Adaptations
One of the best things about this spiderweb Halloween cookie cake is how easy it is to customize. Here are some variations I’ve tried and loved:
Gluten-Free Version
Swap the all-purpose flour for a 1:1 gluten-free baking flour blend. I’ve used Bob’s Red Mill and King Arthur Measure for Measure with great results. Add 1 teaspoon of xanthan gum if your blend doesn’t already include it. The texture will be slightly more tender, but the flavor is spot-on.
Peanut Butter Spiderweb
Replace ½ cup of the butter with ½ cup creamy peanut butter. Reduce the granulated sugar to ¼ cup since peanut butter adds sweetness. The result is a richer, nuttier cookie that pairs beautifully with the dark chocolate ganache. My neighbor’s kids begged me for this version at their Halloween party.
White Chocolate & Cranberry Twist
Substitute the semi-sweet chocolate chips with white chocolate chips and add ½ cup dried cranberries. The tartness of the cranberries cuts through the sweetness, and the white chocolate makes the cookie look like a snow globe. Perfect for a Halloween-to-Thanksgiving transition dessert.
Vegan Adaptation
Use vegan butter sticks (not tub margarine), flax eggs (1 tablespoon ground flaxseed + 3 tablespoons water per egg), and dairy-free chocolate chips. For the ganache, use full-fat coconut cream instead of heavy cream. Let the ganache set in the refrigerator for an extra 15 minutes since coconut cream is softer than dairy cream.
Mini Spiderweb Cookies
Instead of one large cookie cake, portion the dough into 12-15 individual cookies using a ¼-cup scoop. Bake for 12-14 minutes, then top each with a small dollop of ganache and a mini spiderweb. These are perfect for Halloween treat bags or classroom parties.
Personal Favorite: I once made a mocha version by adding 1 tablespoon of instant espresso powder to the flour mixture. The coffee flavor deepened the chocolate ganache in a way that made adults literally close their eyes while eating. Highly recommend if you’re serving a crowd that appreciates grown-up flavors.
Serving & Storage Suggestions
This spiderweb cookie cake is at its best when served at room temperature. The cookie is soft and chewy, and the ganache is firm but not hard—it melts slightly on your tongue. Here’s how to serve and store it:
Serving Temperature: Let the cookie cake sit at room temperature for about 20 minutes after removing it from the refrigerator. If you serve it cold, the ganache will be too firm and the cookie will lose its chewy texture. Room temperature is the sweet spot.
Presentation Tips: Place the cookie cake on a dark cake stand or black serving platter to make the spiderweb pop. Add a few fake spiders around the base for extra spooky vibes. I found a bag of plastic spiders at the dollar store, and they completely transformed the presentation. Just remember to remove them before cutting—no one wants a mouthful of plastic.
What to Serve With It: A scoop of vanilla ice cream is the classic pairing. The cold creaminess balances the rich chocolate ganache. For a non-dairy option, try coconut milk ice cream or a drizzle of cold oat milk. A cup of hot coffee or spiced apple cider also complements the flavors beautifully.
Storage Instructions: Cover the cookie cake loosely with plastic wrap or aluminum foil and store at room temperature for up to 3 days. Do not refrigerate unless you absolutely have to—the fridge dries out the cookie and makes the ganache lose its shine. If you live in a warm climate, store it in a cool, dark place.
Freezing Instructions: You can freeze the baked, undecorated cookie cake for up to 2 months. Wrap it tightly in plastic wrap, then aluminum foil. Thaw at room temperature, then add the ganache and spiderweb decoration fresh. The ganache does not freeze well—it will separate and become grainy.
Reheating: If you want that just-baked warmth, pop a slice in the microwave for 10-15 seconds. The cookie will soften, and the ganache will become slightly melty. It’s not quite the same as fresh from the oven, but it’s pretty close.
Flavor Development: Here’s a little secret—this cookie cake actually tastes better on day two. The flavors meld together overnight, and the texture becomes even more tender. If you can resist eating it the day you make it, you’ll be rewarded with an even better dessert the next day.
Nutritional Information & Benefits
Let’s be real—this is a dessert, and it’s meant to be indulgent. But that doesn’t mean it can’t have some redeeming qualities. Here’s the estimated nutritional breakdown for one slice (based on 12 servings):
| Nutrient | Amount Per Serving |
|---|---|
| Calories | 385 |
| Total Fat | 22g |
| Saturated Fat | 13g |
| Cholesterol | 65mg |
| Sodium | 210mg |
| Total Carbohydrates | 45g |
| Dietary Fiber | 2g |
| Sugars | 30g |
| Protein | 4g |
Health Benefits: Dark chocolate (used in the ganache) is rich in antioxidants called flavonoids, which have been linked to heart health and improved blood flow. The eggs provide high-quality protein and essential amino acids. And the butter? Well, it’s a good source of vitamin A. Everything in moderation, right?
Dietary Considerations: This recipe contains gluten, dairy, and eggs. For gluten-free and vegan adaptations, see the Variations section above. This cookie cake is nut-free as written, but double-check your chocolate chips if you’re serving someone with severe nut allergies.
Personal Wellness Perspective: I believe in balance. This is not an everyday dessert—it’s a celebration cake. It’s the kind of treat you make for a Halloween party, a family gathering, or a Tuesday that just needs a little magic. Enjoy it, savor it, and don’t feel guilty about it. Life is too short for bad desserts and food guilt.
Frequently Asked Questions
Can I make this spiderweb cookie cake ahead of time?
Absolutely. You can bake the cookie base up to 2 days in advance and store it tightly wrapped at room temperature. Add the ganache and spiderweb decoration on the day you plan to serve it for the best presentation. The ganache stays shiny and the web lines stay crisp for about 24 hours.
Why did my spiderweb design turn into a blurry mess?
This usually happens when the ganache is too warm when you pipe the white chocolate. Let the ganache cool for at least 10 minutes after pouring it onto the cookie. It should be set enough that it doesn’t move when you tilt the pan, but still soft enough to drag a toothpick through. If it’s still liquid, wait another 5 minutes and try again.
Can I use milk chocolate instead of semi-sweet?
You can, but the result will be much sweeter. Milk chocolate ganache is thinner and softer than dark chocolate ganache, so it won’t set as firmly. If you prefer milk chocolate, reduce the sugar in the cookie dough by ¼ cup to balance the sweetness. I’ve tried it, and it’s good—just different.
How do I prevent the cookie cake from sticking to the pan?
Grease your pan generously with butter or non-stick spray, then line the bottom with a circle of parchment paper. This is especially important if you’re using a cake pan instead of a well-seasoned cast iron skillet. Let the cookie cool in the pan for 30 minutes before attempting to remove it—this allows it to firm up and release more easily.
My cookie cake spread too thin and looks flat. What went wrong?
This typically happens when the butter is too soft or the dough is overmixed. Make sure your butter is softened but still cool to the touch—not melted or greasy. Also, measure your flour correctly by spooning it into the measuring cup and leveling it off. Too little flour will cause the dough to spread excessively during baking.
Conclusion
This spooky spiderweb Halloween cookie cake with chocolate ganache is more than just a dessert—it’s a conversation starter, a photo opportunity, and a genuinely delicious treat that happens to look like it took hours to make. But here’s the best part: it didn’t. You can whip this up on a Wednesday night, bring it to a party on Thursday, and spend the whole evening watching people’s faces light up when they see that spiderweb.
I love this recipe because it captures everything I want in a Halloween dessert. It’s playful without being childish. It’s impressive without being stressful. And it tastes like the kind of thing you’d find at a cozy bakery in a small town that goes all out for Halloween. The edges are crispy, the center is soft, the ganache is rich, and that spiderweb—honestly, it never gets old.
So go ahead and make this your own. Add extra chocolate chips. Use dark chocolate for a more dramatic web. Throw some candy eyeballs on top for extra spookiness. This recipe is forgiving, flexible, and ready for whatever Halloween throws at you.
I’d love to hear how yours turns out. Did you add your own twist? Did the spiderweb come out perfectly on the first try? Drop a comment below and let me know—I read every single one, and I’m always looking for new ideas to try in my own kitchen. Happy Halloween, and happy baking!
Pin This Recipe!

The Best Spooky Spiderweb Halloween Cookie Cake Recipe

A giant chocolate chip cookie cake topped with silky chocolate ganache and a dramatic spiderweb design. This easy, crowd-pleasing Halloween dessert comes together in about 45 minutes and looks like it took hours.
- Prep Time: 15 minutes
- Cook Time: 25 minutes
- Total Time: 45 minutes
- Yield: 12 servings 1x
- Category: Dessert
- Cuisine: American
Ingredients
- 1 cup (2 sticks) unsalted butter, softened
- 1 cup packed light brown sugar
- ½ cup granulated sugar
- 2 large eggs, room temperature
- 2 teaspoons vanilla extract
- 2 ½ cups all-purpose flour
- 1 teaspoon baking soda
- ½ teaspoon salt
- 1 ½ cups semi-sweet chocolate chips, divided
- ½ cup heavy cream
- 1 cup semi-sweet chocolate chips or chopped chocolate bars
- 1 tablespoon unsalted butter (optional)
- ¼ cup white chocolate chips or melting wafers
- 1 teaspoon coconut oil or vegetable shortening
Instructions
- Preheat your oven to 350°F (175°C). Position the rack in the center of the oven. If using a cast iron skillet, place it in the oven while it preheats. If using a cake pan, set it aside.
- In a large mixing bowl, beat the softened butter, brown sugar, and granulated sugar together on medium speed for 3-4 minutes until light and fluffy. Scrape down the sides halfway through.
- Add the eggs one at a time, beating well after each addition. Then add the vanilla extract and beat until combined.
- In a separate bowl, whisk together the flour, baking soda, and salt.
- Gradually add the dry ingredients to the wet mixture, mixing on low speed until just combined. Do not overmix.
- Reserve ¼ cup of chocolate chips for the top. Fold the remaining 1 ¼ cups into the dough using a rubber spatula.
- If using a cast iron skillet, carefully remove it from the oven and spray lightly with non-stick spray. Transfer the dough to the skillet or prepared cake pan. Using slightly damp fingers, press the dough into an even layer. Press the reserved chocolate chips into the top.
- Bake for 20-25 minutes for a 10-inch pan. The edges should be golden brown and the center should look slightly underdone. A toothpick inserted in the center should come out with a few moist crumbs.
- Place the pan on a cooling rack and let the cookie cake cool for at least 30 minutes in the pan. Then carefully transfer it to the rack to cool completely.
- While the cookie cools, place the chocolate chips for the ganache in a heat-safe bowl. Heat the heavy cream in a small saucepan over medium heat until it just begins to simmer. Pour the hot cream over the chocolate chips. Let it sit for 2-3 minutes, then gently whisk until smooth and glossy. Stir in the butter if using. Let the ganache cool for 5-10 minutes until it thickens slightly but is still pourable.
- Place the cooled cookie cake on your serving plate. Pour the ganache into the center and use a spatula to spread it evenly to the edges, letting it drip over the sides.
- Melt the white chocolate chips with the coconut oil in the microwave in 20-second bursts, stirring between each, until smooth. Transfer to a piping bag or zip-top bag with a tiny corner snipped off. Pipe a spiral starting from the center of the ganache and working outward, leaving about 1 inch between each ring. Working quickly while the ganache is still slightly warm, use a toothpick or skewer to drag lines from the center outward through the white chocolate rings. Wipe the toothpick clean betw…
- Let the cookie cake sit at room temperature for about 30 minutes to allow the ganache to set. If in a hurry, refrigerate for 15 minutes.
Notes
Don’t overbake the cookie; it continues to cook from residual heat. Let the ganache rest until warm to the touch before pouring. Use a light hand with the toothpick for clean web lines. Room temperature ingredients are important for best texture. The cookie cake tastes even better on day two.
Nutrition
- Serving Size: 1 slice
- Calories: 385
- Sugar: 30
- Sodium: 210
- Fat: 22
- Saturated Fat: 13
- Carbohydrates: 45
- Fiber: 2
- Protein: 4
Keywords: Halloween cookie cake, spiderweb cookie cake, chocolate chip cookie cake, Halloween dessert, spooky dessert, giant cookie cake, chocolate ganache cookie cake


