Love this? Save it for later!
Share the inspiration with your friends
The Valentine’s Day cookie swap was in forty-eight hours and I’d completely forgotten. I was standing in my kitchen at 9 PM on a Tuesday, staring at a bag of powdered sugar like it held the answers to life itself. Everyone else would be bringing those elaborate, multi-layered confections that looked like they belonged in a bakery window. I had a half-stick of butter, some cocoa powder, and a vague memory of a recipe my college roommate used to make when we were broke and craving something sweet.
Let me tell you, the panic was real. I mean, I’d RSVP’d yes. I’d even told my friend Maria I’d bring something “really special.” And now here I was, frantically scrolling through my phone for recipes that didn’t require a trip to the store at this hour. That’s when I remembered the red velvet crinkle cookies I’d made once, years ago, for a Valentine’s party that never happened. The recipe was buried in my notes app under “maybe try this???” with a bunch of typos.
Honestly, I almost gave up. The first batch came out looking like sad little red blobs. But I tweaked the measurements, chilled the dough longer, and on the second try—magic. They came out of the oven with those gorgeous crackled tops, dusted in snowy powdered sugar, looking like little love notes. I brought them to the swap feeling sheepish, certain they’d be outshone by the fancy stuff. But you know what? They were the first plate empty. Someone actually asked for the recipe before I’d even taken my coat off.
These red velvet crinkle cookies have been my Valentine’s Day secret weapon ever since. They’re the kind of cookie that looks like you spent hours fussing over them, when really, they come together in about thirty minutes of active work. And maybe you’ve been there—scrambling at the last minute, needing something that feels special but doesn’t require a culinary degree. These cookies are for those moments. They’re for the times when you want to show up with something that says “I care” without saying “I stressed about this for days.”
Why You’ll Love This Recipe
I’ve tested this red velvet crinkle cookie recipe more times than I care to admit. The first few attempts were, well, educational. Too cakey, too flat, not enough crackle. But after about six batches (and some very willing taste-testers from my neighbors), I landed on a version that hits every note just right. Here’s why I think you’ll love it too:
- Quick & Easy: From start to finish, these cookies take about 30 minutes of hands-on time. The dough needs an hour to chill, but that’s passive time where you can binge-watch something or, you know, frantically wrap the rest of your Valentine’s gifts.
- Simple Ingredients: No weird extracts or hard-to-find specialty items. Cocoa powder, flour, sugar, butter, eggs—all pantry staples. The red food coloring is the only “special” ingredient, and you can find it at any grocery store.
- Perfect for Valentine’s Day: The deep red color with the snowy white powdered sugar is basically Valentine’s Day in cookie form. They’re great for classroom parties, office treats, or a cozy night in with someone you love.
- Crowd-Pleaser: I’ve brought these to cookie swaps, potlucks, and even a book club meeting. Kids love them, adults love them, and people who claim they “don’t really like red velvet” have been converted.
- Unbelievably Delicious: The texture is what gets people. That soft, fudgy center with the slightly crisp edges and the crackled top—it’s comfort in every bite. The cocoa flavor is present but not overwhelming, and the powdered sugar adds just the right amount of sweetness.
What makes this recipe different from all the other red velvet crinkle cookie recipes out there? It’s the ratio. I spent a lot of time playing with the butter-to-flour ratio and the chilling time to get that perfect crackle without the cookies spreading into flat discs. The secret is a slightly higher butter content and a longer chill time than most recipes call for. It’s not fancy—it’s just tested and true.
These cookies have become my go-to for any occasion that calls for something a little special without the stress. They’re the kind of cookie that makes you close your eyes after the first bite. And honestly? That’s the best compliment a cookie can get.
What Ingredients You Will Need
This red velvet crinkle cookie recipe uses simple, wholesome ingredients to deliver that signature red velvet flavor and soft, fudgy texture. Most of these are pantry staples, which is exactly what you want when you’re baking on a whim or at the last minute.
For the Cookie Dough
- 1 ½ cups all-purpose flour (spooned and leveled—don’t scoop directly from the bag or you’ll pack in too much)
- ½ cup unsweetened cocoa powder (I prefer Hershey’s Special Dark for a richer color, but regular works great too)
- 1 teaspoon baking powder (make sure it’s not expired—fresh baking powder makes a big difference in the crackle)
- ¼ teaspoon salt (just regular table salt is fine, but kosher salt works too if you reduce to ⅛ teaspoon)
- ½ cup unsalted butter, softened to room temperature (if you use salted butter, skip the added salt)
- 1 cup granulated sugar (this helps create the crackled top as the cookies bake)
- 2 large eggs, room temperature (cold eggs will seize the butter—leave them out for 30 minutes)
- 2 teaspoons vanilla extract (pure vanilla extract is worth it here, but imitation works in a pinch)
- 1 tablespoon red food coloring (gel food coloring gives a more vibrant red without thinning the batter)
- 1 teaspoon white vinegar (this is the secret to that classic red velvet tang—don’t skip it)
For Rolling
- ½ cup powdered sugar (for that snowy coating—you’ll need more if you’re generous with the rolling like I am)
A few ingredient notes from my experience: The cocoa powder you choose really matters. I’ve tried this recipe with Dutch-process cocoa and natural cocoa, and both work, but natural cocoa gives a slightly more traditional red velvet flavor. If you want a deeper, darker red color, go with Dutch-process. Also, about the food coloring—I’ve used liquid and gel, and gel gives a much more vibrant color without adding extra liquid to the dough. That said, liquid works fine; just reduce the vinegar slightly if you’re worried about the dough being too wet.
For the butter, make sure it’s truly softened—not melted, not cold. You should be able to press your finger into it and leave an indent without it being greasy. If you’re in a hurry, cut the butter into small cubes and let it sit for 15 minutes instead of a full hour.
One more thing: the vinegar. I know it sounds weird in cookies, but trust me on this. It reacts with the baking powder and helps create that tender, soft texture that red velvet is famous for. Plus, it balances the sweetness beautifully. Don’t skip it, and don’t substitute it with lemon juice—the flavor profile is different.
Equipment Needed
You don’t need a professional bakery setup for these red velvet crinkle cookies. Here’s what I use:
- Large mixing bowl (any kind works—I use a ceramic one because it feels fancy, but glass or metal is fine)
- Electric hand mixer or stand mixer (you can do this by hand with a whisk and some elbow grease, but the mixer makes creaming the butter and sugar much easier)
- Whisk (for combining the dry ingredients)
- Rubber spatula (for scraping down the bowl and folding in the dry ingredients)
- Measuring cups and spoons (get the metal ones for dry ingredients—they’re more accurate)
- Baking sheets (I use two so I can bake in batches without waiting for the pan to cool)
- Parchment paper or silicone baking mat (parchment is cheaper and works great; silicone mats are reusable and non-stick)
- Cooling rack (wire rack is best for letting the cookies cool evenly)
- Small bowl (for the powdered sugar for rolling)
- Cookie scoop or tablespoon (a 1.5-tablespoon scoop gives the perfect size)
- Plastic wrap (for chilling the dough)
If you don’t have a cookie scoop, don’t worry. I’ve used a regular tablespoon for years before I finally bought one. Just make sure your dough balls are roughly the same size so they bake evenly. And if you don’t have a cooling rack, you can let the cookies cool on the baking sheet for a few extra minutes before transferring them to a plate. It’s not ideal, but it works.
One equipment tip: invest in good parchment paper. The cheap stuff can stick to your cookies, especially with the powdered sugar coating. I use Reynolds or a store brand that’s labeled “non-stick” and I’ve never had a problem.
Preparation Method
Let me walk you through this step by step. I’ve made these red velvet crinkle cookies so many times that I could do it in my sleep, but I’ll share all the little tricks I’ve learned along the way.
- Whisk the dry ingredients together. In a medium bowl, whisk together the flour, cocoa powder, baking powder, and salt. Set this aside. Make sure there are no lumps in the cocoa powder—if there are, sift it or press them through a fine-mesh strainer. Lumps of cocoa in the finished cookie are no fun.
- Cream the butter and sugar. In a large bowl, beat the softened butter and granulated sugar together until light and fluffy. This takes about 2-3 minutes with an electric mixer on medium speed. You want it to look pale and airy. Scrape down the sides and bottom of the bowl with your spatula at least once. I’ve forgotten to do this and ended up with streaks of butter in my dough—not a disaster, but not ideal.
- Add the wet ingredients. Beat in the eggs one at a time, mixing well after each addition. Add the vanilla extract, red food coloring, and vinegar. Mix until everything is combined and the color is uniform. The dough will look very red at this point—that’s good. If it looks pink, add a little more food coloring. I usually end up using about 1 ½ tablespoons of gel coloring for a deep red.
- Combine wet and dry. Gradually add the dry ingredients to the wet mixture, mixing on low speed or folding by hand with your spatula. Mix just until no streaks of flour remain. Overmixing will make the cookies tough. The dough will be soft and slightly sticky—that’s exactly what you want.
- Chill the dough. Cover the bowl with plastic wrap and refrigerate for at least 1 hour. This is non-negotiable. The dough needs to be firm enough to roll into balls without sticking to your hands. I’ve tried rushing this step and ended up with flat, sad cookies that spread into each other on the baking sheet. Trust me, the chill time is worth it. You can even chill it overnight if you want to prep ahead.
- Preheat and prep. About 15 minutes before you’re ready to bake, preheat your oven to 350°F (175°C). Line your baking sheets with parchment paper or silicone mats.
- Roll the dough balls. Place the powdered sugar in a small bowl. Using a cookie scoop or your hands, shape the chilled dough into 1.5-tablespoon balls (about the size of a walnut). Roll each ball between your palms until smooth, then roll it in the powdered sugar until completely coated. Don’t be shy with the sugar—you want a thick, snowy coating. Place the coated dough balls on the prepared baking sheets, spacing them about 2 inches apart. They will spread a little.
- Bake. Bake for 10-12 minutes. The cookies should look puffed and cracked, with the edges set but the centers still slightly soft. They will continue to bake on the hot baking sheet after you take them out, so don’t overbake. I usually pull mine at the 11-minute mark. The crackled top is the sign they’re done—if the cracks look dry and the edges are firm, they’re ready.
- Cool. Let the cookies cool on the baking sheet for 5 minutes. This is important—they’re very delicate when they first come out of the oven. After 5 minutes, transfer them to a wire cooling rack to cool completely. The powdered sugar will set and the cookies will firm up as they cool.
- Repeat. Continue with the remaining dough, making sure your baking sheets are cool before placing new dough balls on them. If you put dough on a hot sheet, the cookies will spread too much.
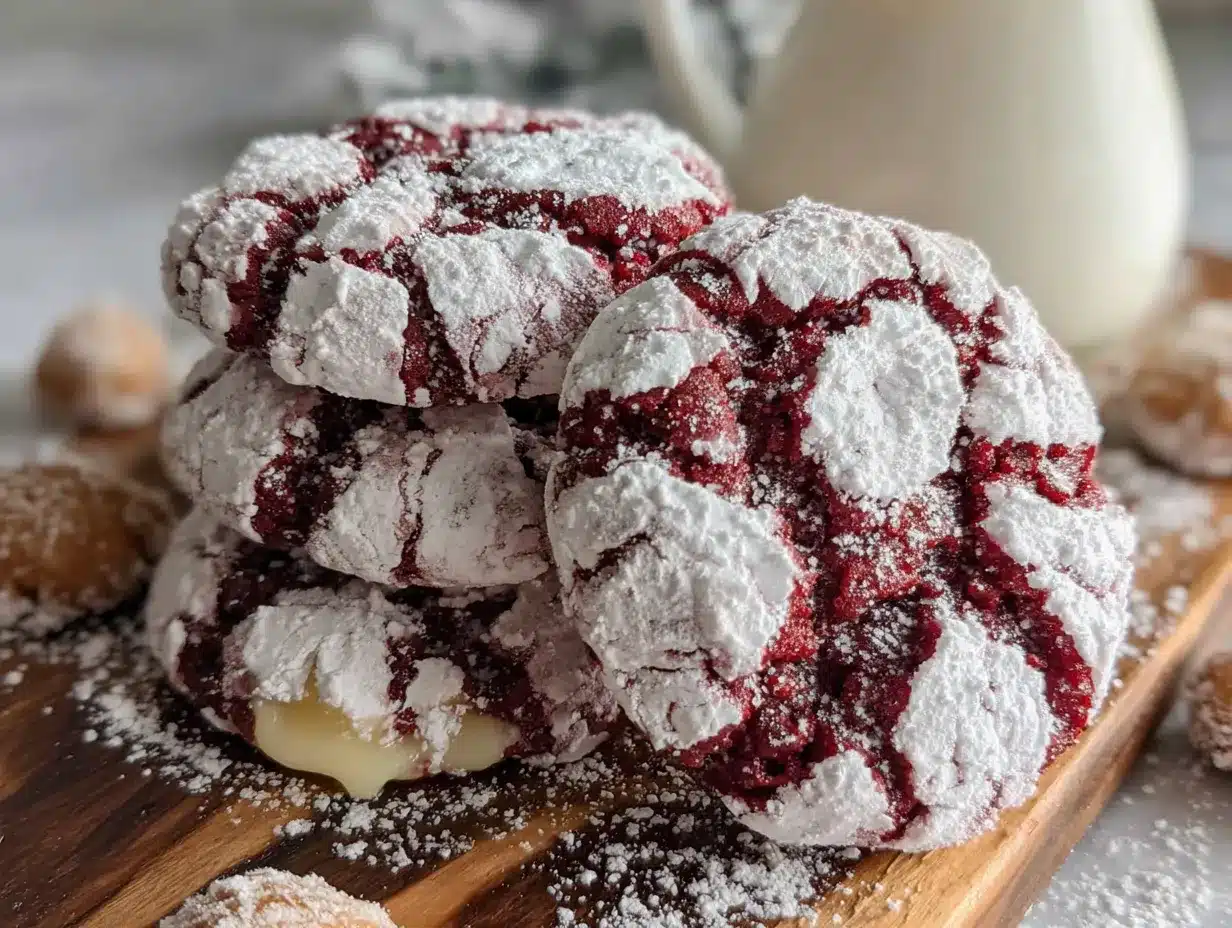
A few sensory cues to watch for: When you’re creaming the butter and sugar, it should look like pale, fluffy clouds. When you add the food coloring, the dough should turn a vibrant, even red—no streaks. And when the cookies come out of the oven, you should see beautiful white cracks against the deep red background, like little snow-covered hills. The smell is incredible—chocolatey and sweet with a hint of vanilla.
Cooking Tips & Techniques
After more batches of these red velvet crinkle cookies than I can count, I’ve collected a few tips that make a real difference. Some of these came from happy accidents; others came from outright failures.
The chilling time is not optional. I learned this the hard way. The first time I made these, I was in a rush and only chilled the dough for 20 minutes. The cookies spread into thin, flat discs with barely any crackle. The powdered sugar just melted into the dough instead of staying on top. Chilling firms up the butter, which means the cookies spread less and the crackle pattern develops properly. One hour minimum, two hours is better, and overnight is perfect.
Roll the dough balls twice in powdered sugar. Here’s a trick I picked up from a bakery blog: roll the dough ball in powdered sugar once, let it sit for 30 seconds, then roll it again. The first layer of sugar kind of melts into the dough, and the second layer stays on top to create that beautiful snowy coating. It uses a bit more sugar, but the result is worth it.
Don’t overmix the dough. I know I’ve said this already, but it’s worth repeating. Overmixing develops the gluten in the flour, which makes cookies tough and dense. You want these cookies to be soft and tender. Mix just until the flour disappears into the dough. A few streaks are fine—they’ll work themselves out as you roll the dough.
Use a cookie scoop for uniform size. This isn’t just about aesthetics, though uniform cookies do look nicer. It’s about even baking. If some cookies are bigger than others, the small ones will overbake while the big ones are still underdone. A 1.5-tablespoon scoop gives you the perfect size—about 2 inches across after baking.
Rotate your baking sheets halfway through. Most ovens have hot spots, and rotating your sheets ensures even baking. I do this at the 6-minute mark. If you’re baking two sheets at once, swap their positions too—top to bottom and front to back.
Let them cool completely before storing. I’ve made the mistake of stacking warm cookies in a container, and the powdered sugar just turned into a sticky mess. Let them cool completely on a wire rack—at least 30 minutes—before you even think about storing them.
Variations & Adaptations
One of the things I love about this red velvet crinkle cookie recipe is how adaptable it is. Over the years, I’ve tried several variations, and here are my favorites:
Gluten-Free Version: Substitute the all-purpose flour with a 1:1 gluten-free baking flour blend. I’ve used Bob’s Red Mill and King Arthur’s gluten-free blends with great results. The texture is slightly more delicate, but the crackle still works beautifully. Add an extra tablespoon of flour if the dough feels too sticky after chilling.
Vegan Adaptation: Replace the butter with vegan butter (I like Miyoko’s or Earth Balance), and use flax eggs (1 tablespoon ground flaxseed mixed with 3 tablespoons water per egg). The texture will be a bit softer, but the flavor is still spot-on. Use a vegan-friendly powdered sugar—some brands use bone char in processing.
White Chocolate Chips: This is my personal favorite variation. Fold in ½ cup of white chocolate chips after mixing the dough. The white chocolate adds little pockets of sweetness that complement the cocoa and the tangy red velvet flavor. Plus, it looks gorgeous with the red and white theme.
Peppermint Red Velvet: Add ½ teaspoon of peppermint extract along with the vanilla, and crush some candy canes to sprinkle on top before baking. This is a fun holiday variation that works for Christmas as well as Valentine’s Day. Just be careful with the peppermint extract—it’s strong, and too much will make the cookies taste like toothpaste.
Dark Chocolate Twist: Use dark cocoa powder instead of regular cocoa for a richer, more intense chocolate flavor. The cookies will be darker in color, so you might need a bit more red food coloring to get that vibrant red. The contrast between the dark chocolate and the powdered sugar is stunning.
Mini Cookie Version: Use a teaspoon scoop instead of a tablespoon for bite-sized cookies. Bake for 7-9 minutes instead of 10-12. These are perfect for party platters or for portion control when you’re trying not to eat an entire batch in one sitting (not that I’ve ever done that).
Serving & Storage Suggestions
These red velvet crinkle cookies are beautiful on their own, but a little presentation goes a long way, especially for Valentine’s Day.
Serving: I like to serve these at room temperature on a pretty plate or cake stand. The powdered sugar stays put better at room temperature—if the cookies are warm, the sugar can get a bit melty. For a Valentine’s Day treat, arrange them on a red or pink plate, or layer them in a gift box with tissue paper. They also look amazing on a cookie platter with other red and pink treats.
Pairings: These cookies are wonderful with a glass of cold milk, a cup of hot coffee, or a mug of hot chocolate. For a more adult pairing, try them with a glass of red wine or a creamy stout beer. The chocolate and tangy flavors play nicely with both.
Storage: Store the cookies in an airtight container at room temperature. They’ll stay fresh for up to 5 days, though I doubt they’ll last that long. Layer them with parchment paper between the layers to prevent the powdered sugar from rubbing off. Don’t store them in the refrigerator—the moisture will make the powdered sugar sticky and the cookies will lose their texture.
Freezing: These cookies freeze beautifully. You can freeze the baked cookies for up to 3 months in a freezer-safe container or bag. Thaw them at room temperature for about 30 minutes before serving. You can also freeze the unbaked dough balls. Roll them into balls, coat them in powdered sugar, and place them on a baking sheet in the freezer until solid. Then transfer them to a freezer bag. When you’re ready to bake, place the frozen dough balls on a baking sheet and bake for 12-14 minutes—no need to thaw. The powdered sugar might not stick as well to frozen dough, so you can roll them in a little extra sugar before baking if you want.
Flavor Development: Here’s something interesting—these cookies actually taste better the day after baking. The flavors meld together and the texture becomes even softer and more fudgy. So if you’re planning for a Valentine’s Day party, bake them a day ahead. Your future self will thank you.
Nutritional Information & Benefits
Let’s be real—these are cookies, not health food. But I believe in enjoying treats in moderation, and these red velvet crinkle cookies are worth every bite. Here’s the approximate nutritional breakdown per cookie (based on 24 cookies):
- Calories: 145
- Total Fat: 6g
- Saturated Fat: 3.5g
- Cholesterol: 28mg
- Sodium: 65mg
- Total Carbohydrates: 22g
- Dietary Fiber: 1g
- Sugars: 14g
- Protein: 2g
These numbers are estimates and will vary based on your specific ingredients and portion sizes. If you’re watching your sugar intake, you can reduce the granulated sugar to ¾ cup—the cookies will be less sweet but still delicious.
On the positive side, cocoa powder is rich in antioxidants called flavanols, which have been linked to heart health and improved blood flow. So there’s that! And the eggs provide a little protein and healthy fats. Honestly, I think the biggest benefit is the joy these cookies bring. There’s something about sharing a homemade treat that just makes people happy. And that’s a benefit worth having.
For those with dietary concerns: these cookies contain gluten, dairy, and eggs. They are not suitable for celiac, vegan, or dairy-free diets without modifications. I’ve included substitution notes in the variations section above.
Conclusion
These red velvet crinkle cookies have become a Valentine’s Day tradition in my kitchen, and I hope they become one in yours too. They’re the kind of cookie that looks like you spent hours on them, when really, they’re one of the simplest recipes in my collection. The deep red color, the snowy powdered sugar, the soft fudgy center—it’s everything you want in a Valentine’s Day treat.
What I love most about this recipe is how forgiving it is. Even my early, imperfect batches were still delicious. And once you get the hang of the chilling time and the double-coating in powdered sugar, these cookies are practically foolproof. They’re perfect for when you want to show someone you care, whether that’s a partner, a friend, a coworker, or yourself.
I’d love to hear how these turn out for you! Did you try any of the variations? Did your cookie swap friends fight over the last one? Drop a comment below and let me know. And if you have your own twist on these cookies—maybe a different extract or a new topping—share that too. Happy baking, and happy Valentine’s Day!
Frequently Asked Questions
Why did my cookies not crackle?
The most common reason is not chilling the dough long enough. The dough needs to be firm so the outside sets quickly in the oven while the inside continues to spread, creating those cracks. Also, make sure you’re rolling the dough balls generously in powdered sugar—a thick coating helps the cracks form.
Can I use natural food coloring instead of gel?
Yes, you can use liquid food coloring, but you’ll need more of it to achieve a deep red color. Start with 1 tablespoon and add more until you’re happy with the color. Just be aware that extra liquid can make the dough slightly stickier, so you might need to chill it a bit longer.
Can I make the dough ahead of time?
Absolutely! The dough can be refrigerated for up to 3 days before baking. Just make sure it’s tightly covered with plastic wrap so it doesn’t dry out. You can also freeze the dough balls for up to 3 months—just bake them from frozen, adding a couple of extra minutes to the baking time.
Why did my cookies spread too much?
This usually happens when the dough isn’t chilled enough, or the butter was too soft when you mixed it. Make sure your butter is softened but not melted, and don’t skip the chilling step. Also, check that your baking sheets are cool before placing new dough balls on them—hot pans will cause the cookies to spread immediately.
Can I reduce the sugar in this recipe?
You can reduce the granulated sugar to ¾ cup without affecting the texture too much, but the cookies will be less sweet and the crackle might be slightly less pronounced. I wouldn’t recommend reducing the powdered sugar for rolling—that’s what creates the signature crinkle look.
Pin This Recipe!

Best Easy Red Velvet Crinkle Cookies for Valentine’s Day

These red velvet crinkle cookies are soft, fudgy, and dusted with snowy powdered sugar. They come together in about 30 minutes of active work and are perfect for Valentine’s Day cookie swaps, parties, or a cozy night in.
- Prep Time: 30 minutes
- Cook Time: 10-12 minutes per batch
- Total Time: 1 hour 40 minutes (includes 1 hour chilling)
- Yield: 24 cookies 1x
- Category: Dessert
- Cuisine: American
Ingredients
- 1 ½ cups all-purpose flour (spooned and leveled)
- ½ cup unsweetened cocoa powder
- 1 teaspoon baking powder
- ¼ teaspoon salt
- ½ cup unsalted butter, softened to room temperature
- 1 cup granulated sugar
- 2 large eggs, room temperature
- 2 teaspoons vanilla extract
- 1 tablespoon red food coloring (gel preferred)
- 1 teaspoon white vinegar
- ½ cup powdered sugar (for rolling)
Instructions
- Whisk the dry ingredients together: In a medium bowl, whisk together the flour, cocoa powder, baking powder, and salt. Set aside.
- Cream the butter and sugar: In a large bowl, beat the softened butter and granulated sugar together until light and fluffy, about 2-3 minutes with an electric mixer on medium speed. Scrape down the sides and bottom of the bowl.
- Add the wet ingredients: Beat in the eggs one at a time, mixing well after each addition. Add the vanilla extract, red food coloring, and vinegar. Mix until everything is combined and the color is uniform.
- Combine wet and dry: Gradually add the dry ingredients to the wet mixture, mixing on low speed or folding by hand with a spatula. Mix just until no streaks of flour remain. The dough will be soft and slightly sticky.
- Chill the dough: Cover the bowl with plastic wrap and refrigerate for at least 1 hour (or up to overnight).
- Preheat and prep: About 15 minutes before baking, preheat your oven to 350°F (175°C). Line baking sheets with parchment paper or silicone mats.
- Roll the dough balls: Place the powdered sugar in a small bowl. Using a cookie scoop or your hands, shape the chilled dough into 1.5-tablespoon balls (about the size of a walnut). Roll each ball between your palms until smooth, then roll it in the powdered sugar until completely coated. Place on prepared baking sheets, spacing them about 2 inches apart.
- Bake: Bake for 10-12 minutes. The cookies should look puffed and cracked, with the edges set but the centers still slightly soft.
- Cool: Let the cookies cool on the baking sheet for 5 minutes, then transfer to a wire cooling rack to cool completely.
- Repeat: Continue with the remaining dough, making sure your baking sheets are cool before placing new dough balls on them.
Notes
Chilling the dough is non-negotiable for proper crackle. Roll dough balls twice in powdered sugar for a thicker coating. Cookies taste even better the day after baking. Store in an airtight container at room temperature for up to 5 days. Freeze baked cookies for up to 3 months.
Nutrition
- Serving Size: 1 cookie
- Calories: 145
- Sugar: 14
- Sodium: 65
- Fat: 6
- Saturated Fat: 3.5
- Carbohydrates: 22
- Fiber: 1
- Protein: 2
Keywords: red velvet crinkle cookies, Valentine's Day cookies, easy cookie recipe, red velvet cookies, crinkle cookies


