Love this? Save it for later!
Share the inspiration with your friends
Last September, my husband declared he had no use for candied jalapeños. “Too sweet,” he said. “Not spicy enough. What’s the point?” He was emphatic, arms crossed, standing in my kitchen while I was elbow-deep in a massive pile of jalapeños from the farmer’s market. I just nodded, kept slicing, and told myself this batch was for me. For the record, I made three pints that day. Two days later, I opened the pantry to grab one for a recipe, and both were gone. I found him in the living room, a stack of crackers and a jar of cowboy candy on the coffee table, looking like a kid caught with his hand in the cookie jar. “These are different,” he mumbled. “These are actually good.”
And honestly, that’s the story of this sweet & spicy cowboy candy canning recipe. It’s the one that changes minds. It’s not just another pickled pepper recipe—it’s a perfect balance of heat and sweetness that gets people hooked. I mean, I’ve had friends who claim to hate spicy food ask me for the recipe after trying it on a burger. I’ve had my dad, a man who puts hot sauce on everything, tell me it’s “dangerously addictive.” That’s the power of this stuff. It’s candied jalapeños, sure, but it’s also the secret ingredient you didn’t know you needed.
Maybe you’ve been there—you see a jar of cowboy candy at the store, you wonder if it’s worth the hype, and you walk away. Let me tell you, making it at home is a game-changer. This recipe has stayed with me because it’s the kind of thing that makes you look like a kitchen wizard with minimal effort. It’s sweet, it’s spicy, and it’s the perfect addition to everything from cheese boards to tacos to grilled meats. You’re going to love it.
Why You’ll Love This Recipe
This isn’t just another canning recipe you’ll try once and forget. This sweet & spicy cowboy candy canning recipe has earned a permanent spot in my pantry rotation, and here’s why it will in yours too:
- Perfectly Balanced Flavor: The key here is the balance. It’s not too sweet, not too spicy—it’s just right. The sugar syrup mellows out the jalapeño heat without killing it entirely, leaving you with a complex, addictive flavor.
- Simple, Pantry-Friendly Ingredients: You don’t need any exotic ingredients. Jalapeños, sugar, vinegar, and a few spices. That’s it. No trips to specialty stores, no hunting down obscure items.
- Long Shelf Life: When properly canned, these babies will sit happily in your pantry for up to a year. That means you can make a big batch when jalapeños are cheap and enjoy them all year round.
- Incredibly Versatile: I put this stuff on everything. Burgers, hot dogs, tacos, nachos, cream cheese with crackers, grilled cheese sandwiches, even stirred into BBQ sauce. It’s the condiment you never knew you needed.
- Makes a Fantastic Gift: A jar of homemade cowboy candy tied with a ribbon? That’s a gift that says “I put in effort” without you actually having to put in that much effort. Trust me, people love getting these.
What makes this recipe different from the rest? It’s the ratio. I’ve tested this multiple times to get that perfect sweet-heat balance. Some recipes use too much sugar, turning the peppers into candy that’s cloying. Others don’t use enough, leaving you with sad, soggy jalapeños. This one hits the sweet spot—literally and figuratively. I’ve also included a trick for getting the syrup to the perfect consistency, so you don’t end up with watery cowboy candy.
This recipe isn’t just good—it’s the kind that makes you close your eyes after the first bite. It’s comfort food with a kick, and it’s the perfect way to preserve the summer jalapeño bounty.
What Ingredients You Will Need
This recipe uses simple, wholesome ingredients to deliver that signature sweet and spicy punch. Most of these are pantry staples, but a few key choices make all the difference.
- Fresh Jalapeños (2 pounds): This is the star of the show. Look for firm, smooth-skinned jalapeños with no soft spots. The size doesn’t matter much, but try to get them relatively uniform for even cooking. I usually buy a mix of green and a few red ones for color contrast.
- Granulated Sugar (4 cups): This is what creates that thick, syrupy coating. Don’t try to reduce the sugar drastically—it’s essential for the texture and preservation. You can use organic cane sugar if you prefer.
- Apple Cider Vinegar (1 cup): I prefer apple cider vinegar for its slightly fruity, mellow acidity. White vinegar works in a pinch, but it’s sharper. Bragg’s or any good quality brand is fine.
- Turmeric Powder (1/2 teaspoon): This is for color, not flavor. It gives the syrup that beautiful golden hue. You won’t taste it, I promise.
- Celery Seed (1/2 teaspoon): Adds a subtle savory note that balances the sweetness. Don’t skip it—it’s a small amount but it makes a difference.
- Garlic Powder (1/2 teaspoon): A whisper of garlic in the background. It’s not overpowering, just enough to add depth.
- Crushed Red Pepper Flakes (1/2 teaspoon): This is optional, but I love it. It adds an extra layer of heat that lingers. If you’re sensitive to spice, leave it out.
- Salt (1/2 teaspoon): Just a pinch to enhance all the flavors. I use fine sea salt.
- Liquid Pectin (1 packet, 1.75 oz): This is the secret to that thick, jammy syrup. Some recipes skip it, but I find it gives a much better texture. You can find it in the baking aisle, usually near the gelatin. I use Sure-Jell brand.
Substitution Guidance: If you want a milder version, you can mix in some bell peppers or Anaheim peppers with the jalapeños. For a spicier kick, add a few serrano peppers to the mix. If you’re avoiding sugar, this recipe is not ideal for sugar substitutes—the pectin needs sugar to set properly. You can reduce the sugar by half a cup, but the syrup will be thinner.
Equipment Needed
You don’t need a fancy kitchen to make this cowboy candy, but a few key tools make the process much smoother.
- Canning Pot or Large Stockpot: You need a pot deep enough to cover the jars with at least an inch of water. I use a 21-quart canning pot, but any large pot works.
- Canning Jars (4-5 half-pint jars): Half-pint (8 oz) jars are perfect for cowboy candy. You can also use quarter-pint jars for gifting. Make sure they’re in good condition with no cracks or chips.
- New Canning Lids and Bands: Always use new lids for a proper seal. The bands can be reused if they’re not rusty.
- Jar Lifter: This is non-negotiable. Trying to lift hot jars with tongs is a recipe for disaster. A jar lifter is cheap and saves your hands.
- Wide-Mouth Funnel: Makes filling the jars so much easier and less messy. A regular funnel works, but the wide-mouth is better for chunks of peppers.
- Magnetic Lid Lifter: Not essential, but handy for fishing lids out of hot water. I use a pair of clean tongs instead.
- Bubble Remover/Headspace Tool: A chopstick or a thin spatula works perfectly. You just need something to release air bubbles from the jars.
- Clean Kitchen Towels: For drying jars and wiping rims. Paper towels work too, but cloth is more eco-friendly.
Budget-Friendly Tip: If you don’t have a canning pot, you can use any deep pot and place a folded kitchen towel at the bottom to prevent the jars from rattling. It’s not ideal, but it works in a pinch.
Preparation Method
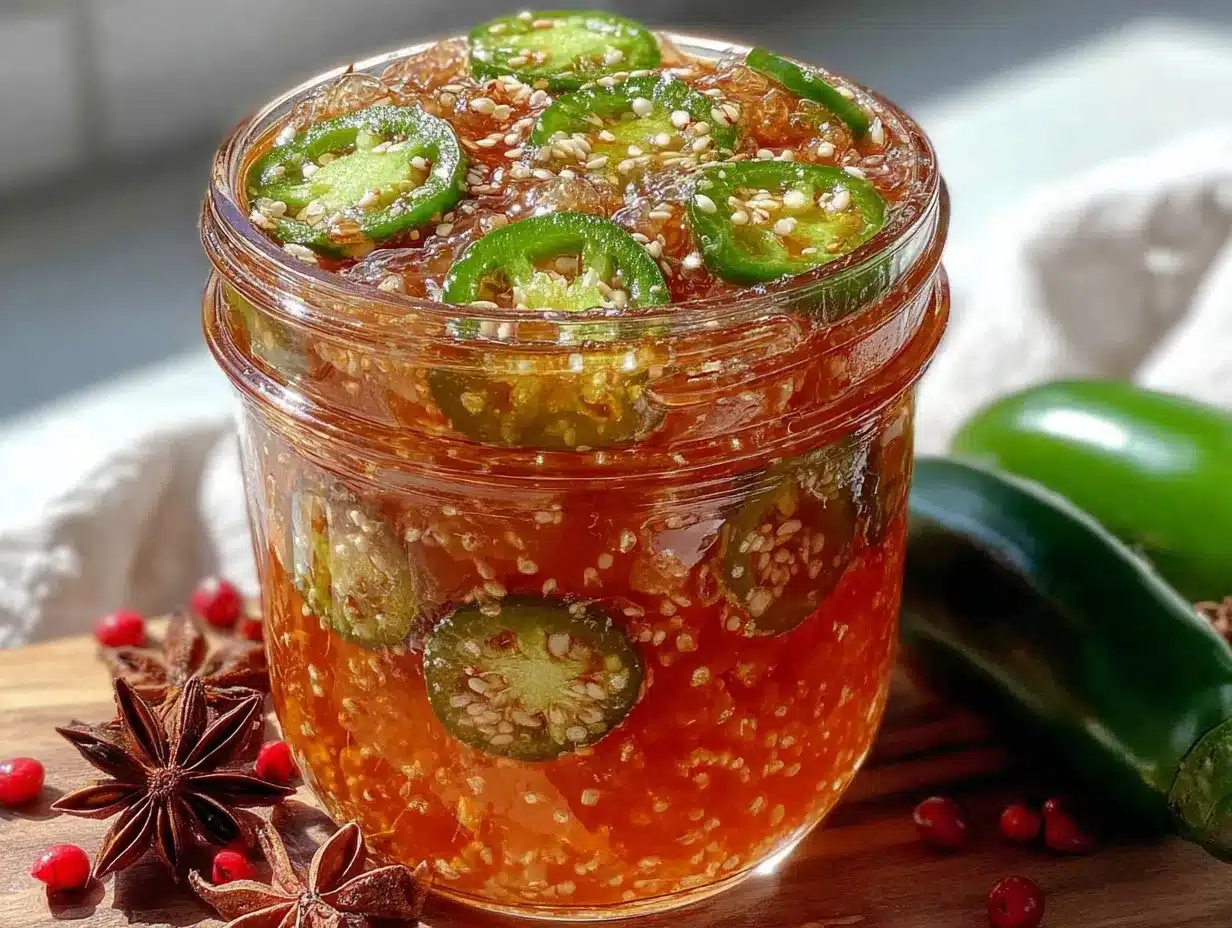
Alright, let’s get to the fun part. Here’s how to make this sweet & spicy cowboy candy canning recipe step by step.
- Prepare the Jalapeños (15 minutes): Put on some gloves. I mean it. Jalapeño oils will burn your hands for hours if you don’t. Wash the jalapeños thoroughly. Slice off the stems, then slice the peppers into uniform rounds, about 1/4-inch thick. You can leave the seeds in for more heat, or remove them for a milder candy. I usually leave half the seeds in for a nice medium heat. You should have about 6-7 cups of sliced peppers.
- Sterilize the Jars (10 minutes): While you’re slicing, get your canning pot filled with water and bring it to a boil. Place your clean jars in the water and let them boil for 10 minutes to sterilize. Reduce the heat to a simmer and keep the jars in the hot water until you’re ready to fill them. Put the lids in a small saucepan of simmering water (not boiling) to soften the seals.
- Make the Syrup (15 minutes): In a large, non-reactive pot (stainless steel or enameled), combine the sugar, apple cider vinegar, turmeric, celery seed, garlic powder, crushed red pepper flakes, and salt. Stir everything together and bring it to a boil over medium-high heat. Stir occasionally to help the sugar dissolve. Once it’s boiling, reduce the heat to medium and let it boil for 5 minutes, stirring occasionally. The syrup will be thin at this point—don’t worry, it thickens later.
- Add the Jalapeños (10 minutes): Carefully add all the sliced jalapeños to the boiling syrup. Stir gently to coat all the peppers. Let the mixture return to a full rolling boil that doesn’t stop when you stir it. Boil for exactly 4 minutes, stirring frequently. The peppers will soften slightly and release some liquid.
- Add the Pectin (2 minutes): Sprinkle the liquid pectin over the boiling mixture and stir constantly for 1-2 minutes. The syrup will start to thicken noticeably. Remove the pot from the heat. You’ll see a lot of foam on top—that’s normal. Let it sit for 1 minute, then skim off the foam with a spoon.
- Fill the Jars (15 minutes): Using your jar lifter, remove one hot jar from the water, dumping the water back into the pot. Place it on a clean towel. Using your wide-mouth funnel, ladle the hot cowboy candy into the jar, leaving 1/4-inch headspace. Use your bubble remover tool to gently stir and release any air pockets. Wipe the jar rim with a clean, damp towel to remove any sticky syrup. Center a lid on the jar and screw on the band until it’s fingertip-tight (tight, but not cranked down). Repeat with the remaining jars.
- Process the Jars (10 minutes): Place the filled jars back into the canning pot, making sure they’re covered by at least 1 inch of water. Put the lid on the pot and bring it back to a full boil. Once boiling, process the jars for 10 minutes (adjust for altitude if needed). Turn off the heat and let the jars sit in the water for 5 minutes.
- Cool and Check Seals (12-24 hours): Using your jar lifter, remove the jars and place them on a clean towel on the counter. Leave them undisturbed for 12-24 hours. You’ll hear the satisfying “pop” as the lids seal. After they’re cool, press the center of each lid—it should be concave and not flex. If a lid pops up and down, that jar didn’t seal and needs to be refrigerated and used within a few weeks.
Cooking Tips & Techniques
I’ve made this recipe more times than I can count, and I’ve definitely learned a few things the hard way. Here are my best tips for success.
Wear Gloves, Seriously. I know I said it already, but let me tell you about the time I didn’t. I was in a hurry, thought I’d be fine, and ended up with burning hands at 2 AM. I tried soaking them in milk, rubbing them with alcohol, everything. Don’t be me. Wear the gloves.
Don’t Overcook the Peppers. The 4-minute boil is crucial. If you cook them too long, the jalapeños turn mushy and lose their texture. You want them to be tender but still have a slight bite. They’ll continue to soften slightly in the jars as they sit.
Use a Timer for the Pectin. Once you add the pectin, you have a very small window before it starts to set. Stir constantly and don’t walk away. I once got distracted by a phone call and ended up with a pot of overly thick, gummy syrup. It still tasted good, but the texture was off.
Skim the Foam. The foam that forms on top is just air bubbles and impurities. If you don’t skim it, it’ll end up in your jars and make the syrup look cloudy. A quick skim with a spoon makes a big difference in appearance.
Check Your Altitude. If you live above 1,000 feet, you need to adjust your processing time. At 1,001-3,000 feet, add 5 minutes. At 3,001-6,000 feet, add 10 minutes. Above 6,000 feet, add 15 minutes. This ensures safe preservation.
Let Them Rest. The cowboy candy tastes good right away, but it’s amazing after a week or two. The flavors meld, the peppers absorb more syrup, and the texture becomes perfect. Try to wait at least a week before opening a jar. I know it’s hard, but it’s worth it.
Variations & Adaptations
One of the best things about this recipe is how customizable it is. Here are some variations I’ve tried and loved.
- Milder Version: Swap half the jalapeños for sliced bell peppers (red or orange for sweetness). This tones down the heat significantly while keeping the sweet, syrupy texture. Great for kids or spice-sensitive folks.
- Extra Spicy Version: Add 2-3 sliced serrano peppers or habaneros (with seeds) to the mix. You can also increase the crushed red pepper flakes to 1 teaspoon. This version has a serious kick—perfect for chili heads.
- Smoky Version: Add 1 teaspoon of smoked paprika to the syrup. It gives the cowboy candy a subtle smoky depth that’s incredible on burgers and hot dogs. I tried this on a whim and it became a favorite.
- Honey-Sweetened Version: Replace 1 cup of the granulated sugar with 3/4 cup of honey. The flavor is a bit more complex, but the texture will be slightly thinner. You may need to adjust the pectin slightly—add an extra tablespoon of pectin if you want a thicker syrup.
- Garlic Lover’s Version: Add 4-5 thinly sliced garlic cloves to the syrup along with the peppers. The garlic becomes soft and sweet, and it’s delicious spread on crackers with cream cheese.
Serving & Storage Suggestions
This cowboy candy is incredibly versatile. Here’s how I like to use and store it.
Serving Ideas: The most classic way is to serve it over a block of cream cheese with crackers. It’s a party favorite that disappears in minutes. I also love it on burgers—just spoon a generous amount on top of the patty. It’s amazing on hot dogs, bratwurst, and pulled pork sandwiches. Stir it into BBQ sauce for a sweet and spicy kick, or use it as a glaze for grilled chicken or pork chops. I’ve even added it to mac and cheese for a spicy twist.
Storage: Sealed jars can be stored in a cool, dark pantry for up to 12 months. Once opened, refrigerate the jar and use within 3-4 weeks. The syrup may thicken in the fridge—just let it sit at room temperature for 10 minutes before using.
Flavor Development: The flavor really develops over time. After about 2 weeks, the heat mellows slightly and the sweetness becomes more pronounced. The peppers also absorb more syrup, becoming plumper and more flavorful. I always try to make a batch and forget about it for a month—it’s always worth the wait.
Nutritional Information & Benefits
While this is definitely a treat, there are a few nutritional bright spots.
- Estimated per serving (2 tablespoons): Calories: 60, Fat: 0g, Carbohydrates: 15g, Sugar: 14g, Fiber: 0.5g, Protein: 0g, Sodium: 25mg.
- Jalapeños are rich in vitamin C and capsaicin, which has anti-inflammatory properties and can boost metabolism. Of course, the sugar content is high, so moderation is key.
- Dietary Considerations: This recipe is naturally gluten-free, dairy-free, and vegan. It’s also nut-free and egg-free.
- Allergens: None of the common allergens are present, but always check your ingredient labels if you have specific concerns.
- Personal Perspective: I see this as a way to enjoy a little indulgence while still getting some of the benefits of fresh peppers. It’s not health food, but it’s a delicious way to add flavor to your meals without relying on processed condiments.
Conclusion
This sweet & spicy cowboy candy canning recipe is one of those things that once you try it, you’ll wonder how you ever lived without it. It’s sweet, it’s spicy, it’s incredibly versatile, and it makes you look like a canning pro. Whether you’re spreading it on a burger, serving it with cream cheese, or giving it as a gift, it’s guaranteed to impress.
I encourage you to make this recipe your own. Adjust the spice level, try different pepper combinations, or add your favorite spices. The beauty of canning is that you can experiment and find your perfect version. I’ve made this recipe dozens of times, and I still tweak it based on what I’m craving.
I’d love to hear how yours turns out! Leave a comment below and let me know what you used it on, or tag me in your photos on social media. Happy canning, friend—you’ve got this!
Frequently Asked Questions
Can I use frozen jalapeños for this recipe?
Fresh jalapeños are best for this recipe. Frozen peppers have a higher water content and will release too much liquid, making the syrup thin and the peppers mushy. Stick with fresh for the best texture and flavor.
Do I have to use liquid pectin?
Yes, for this recipe, liquid pectin is recommended. Powdered pectin requires a different ratio of sugar and a different cooking method. If you only have powdered pectin, you’ll need to adjust the recipe significantly. Stick with liquid for guaranteed results.
Why didn’t my jars seal?
There are a few common reasons: the jar rims weren’t clean (syrup residue prevents a seal), the lids weren’t new, or the jars weren’t processed long enough. Always wipe the rims with a clean, damp towel before putting on the lids, and use new lids every time.
Can I reduce the sugar in this recipe?
You can reduce it by up to 1 cup, but the syrup will be thinner and the texture won’t be as jammy. The sugar also acts as a preservative, so reducing it too much could affect shelf life. I don’t recommend reducing it by more than half a cup.
How long does homemade cowboy candy last?
Properly sealed jars will last up to 12 months in a cool, dark pantry. Once opened, refrigerate and use within 3-4 weeks. If a jar doesn’t seal, refrigerate it immediately and use it within 2-3 weeks—it’s still delicious, just not shelf-stable.
Pin This Recipe!
Sweet & Spicy Cowboy Candy Canning Recipe (Easy & Best)
This sweet & spicy cowboy candy canning recipe is the perfect balance of heat and sweetness. It’s a versatile condiment that changes minds, perfect on burgers, tacos, cheese boards, and more.
- Prep Time: 15 minutes
- Cook Time: 30 minutes
- Total Time: 45 minutes
- Yield: 4-5 half-pint jars 1x
- Category: Condiment
- Cuisine: American
Ingredients
- 2 pounds fresh jalapeños
- 4 cups granulated sugar
- 1 cup apple cider vinegar
- 1/2 teaspoon turmeric powder
- 1/2 teaspoon celery seed
- 1/2 teaspoon garlic powder
- 1/2 teaspoon crushed red pepper flakes (optional)
- 1/2 teaspoon fine sea salt
- 1 packet (1.75 oz) liquid pectin
Instructions
- Prepare the Jalapeños (15 minutes): Put on gloves. Wash jalapeños thoroughly. Slice off stems, then slice into uniform rounds about 1/4-inch thick. Leave seeds in for more heat or remove for milder candy. You should have about 6-7 cups of sliced peppers.
- Sterilize the Jars (10 minutes): Fill canning pot with water and bring to a boil. Place clean jars in water and boil for 10 minutes to sterilize. Reduce heat to simmer and keep jars in hot water until ready to fill. Put lids in a small saucepan of simmering water to soften seals.
- Make the Syrup (15 minutes): In a large non-reactive pot, combine sugar, apple cider vinegar, turmeric, celery seed, garlic powder, crushed red pepper flakes, and salt. Bring to a boil over medium-high heat, stirring occasionally. Once boiling, reduce heat to medium and boil for 5 minutes, stirring occasionally.
- Add the Jalapeños (10 minutes): Carefully add all sliced jalapeños to boiling syrup. Stir gently to coat. Let mixture return to a full rolling boil. Boil for exactly 4 minutes, stirring frequently.
- Add the Pectin (2 minutes): Sprinkle liquid pectin over boiling mixture and stir constantly for 1-2 minutes until syrup thickens noticeably. Remove pot from heat. Let sit for 1 minute, then skim off foam with a spoon.
- Fill the Jars (15 minutes): Using jar lifter, remove one hot jar from water, dumping water back into pot. Place on clean towel. Using wide-mouth funnel, ladle hot cowboy candy into jar, leaving 1/4-inch headspace. Use bubble remover tool to release air pockets. Wipe jar rim with clean damp towel. Center lid on jar and screw on band until fingertip-tight. Repeat with remaining jars.
- Process the Jars (10 minutes): Place filled jars back into canning pot, ensuring they’re covered by at least 1 inch of water. Put lid on pot and bring to a full boil. Process jars for 10 minutes (adjust for altitude if needed). Turn off heat and let jars sit in water for 5 minutes.
- Cool and Check Seals (12-24 hours): Using jar lifter, remove jars and place on clean towel on counter. Leave undisturbed for 12-24 hours. Listen for ‘pop’ as lids seal. After cooling, press center of each lid—it should be concave and not flex. If lid pops up and down, refrigerate and use within a few weeks.
Notes
Wear gloves when handling jalapeños to avoid burning hands. Don’t overcook peppers—4-minute boil is crucial for texture. Use a timer for pectin addition. Skim foam for clear syrup. Adjust processing time for altitude above 1,000 feet. Let jars rest at least a week before opening for best flavor development.
Nutrition
- Serving Size: 2 tablespoons
- Calories: 60
- Sugar: 14
- Sodium: 25
- Carbohydrates: 15
- Fiber: 0.5
Keywords: cowboy candy, candied jalapeños, canning recipe, sweet and spicy, jalapeño recipe, homemade condiment, pepper jelly


