Love this? Save it for later!
Share the inspiration with your friends
Last July, my neighbor Margie watched me struggling to carry a grocery bag, a watermelon, and a wobbly stack of paper plates to my porch. She didn’t say anything at first. Then she just shook her head, walked over, and took the bag from my hands. “You’re overcomplicating things,” she said, nodding toward the mess I was making. “Come over tomorrow. I’ll show you something that takes ten minutes and tastes like you actually tried.” I laughed, figuring she was being generous. But honestly? She wasn’t wrong.
The next afternoon, I showed up at her kitchen door, and she had this gorgeous, layered icebox cake sitting on her counter. Red, white, and blue stripes running through it like a flag you could eat. She didn’t use a mixer. She didn’t turn on the oven. She just stacked cookies, whipped cream, and berries in a dish and let the fridge do the work. I stood there watching, feeling a little silly for all the complicated desserts I had been making. The whole thing took maybe fifteen minutes of hands-on time. Fifteen minutes. And the result was this stunning, creamy, berry-filled dessert that everyone at her barbecue went crazy over.
I asked her where she learned it, and she just shrugged. “My mom used to make something like this for the Fourth. I just swapped in whatever I had.” That’s the thing about this recipe—it’s not precious or fussy. It’s the kind of dessert that comes from someone who’s been feeding people for decades and knows what actually works. The kind where you don’t need special pans or culinary training. You need a dish, some store-bought cookies, and a little patience while the fridge does its magic.
I’ve made this Easy Red White and Blueberry No-Bake Icebox Cake at least a dozen times since that day. For cookouts, for lazy Sunday afternoons, for no reason at all except that I wanted something cold and sweet. Maybe you’ve been there—standing in your kitchen in July, not wanting to turn on the oven, but still wanting to bring something beautiful to the table. This one’s for you. Let me tell you, it never gets old.
Why You’ll Love This Recipe
This Easy Red White and Blueberry No-Bake Icebox Cake is the kind of dessert that makes you look like a hero without breaking a sweat. I’ve tested it with different brands of cookies, swapped in frozen berries when fresh weren’t available, and even doubled the batch for a crowd. It holds up beautifully every single time. Let me share why this recipe has earned a permanent spot in my summer rotation.
- No Oven Required: When the temperature hits 90 degrees, the last thing you want to do is heat up your kitchen. This cake comes together entirely in the fridge. No baking, no fuss, no sweat.
- Simple Ingredients: You likely have most of these in your kitchen right now. Vanilla wafers, heavy cream, cream cheese, and fresh berries. No fancy grocery store trips needed.
- Perfect for Patriotic Holidays: The red, white, and blue layers make it an obvious choice for Memorial Day, Fourth of July, or Labor Day. But honestly, I make it all summer long.
- Crowd-Pleaser: Kids and adults both go back for seconds. The creamy, slightly tangy filling paired with soft cookies and fresh berries is irresistible.
- Make-Ahead Friendly: This cake actually gets better after a day in the fridge. You can prep it the night before your party and just pull it out when guests arrive.
What makes this version different from other icebox cakes is the cream cheese layer. Most recipes just use whipped cream and cookies, but that can taste a little flat. By blending cream cheese with a bit of powdered sugar and vanilla, you get this rich, slightly tangy filling that balances the sweetness of the berries and cookies perfectly. It’s not just another no-bake dessert—it’s the one people will ask you for the recipe.
There’s something about cutting into those chilled layers and seeing the stripes of red, white, and blue. It makes people smile. And honestly, that’s the whole point, isn’t it? This recipe isn’t just good. It’s the kind that makes you close your eyes after the first bite and forget about the heat outside.
What Ingredients You Will Need
This recipe uses simple, wholesome ingredients to deliver bold flavor and satisfying texture without the fuss. Most of these are pantry staples or easy to find at any grocery store. Here’s exactly what you need:
For the Cream Cheese Layer
- 8 ounces cream cheese, softened (I recommend Philadelphia brand for the smoothest texture. Let it sit on the counter for 30 minutes before starting.)
- 1/2 cup powdered sugar (Also called confectioners’ sugar. Sift it if you have lumps, but honestly, I skip that step most of the time.)
- 1 teaspoon vanilla extract (Pure vanilla extract tastes best, but imitation works fine in a pinch.)
- 2 cups heavy whipping cream (Cold cream whips up faster and holds its shape better. Keep it in the fridge until you’re ready.)
For the Layers
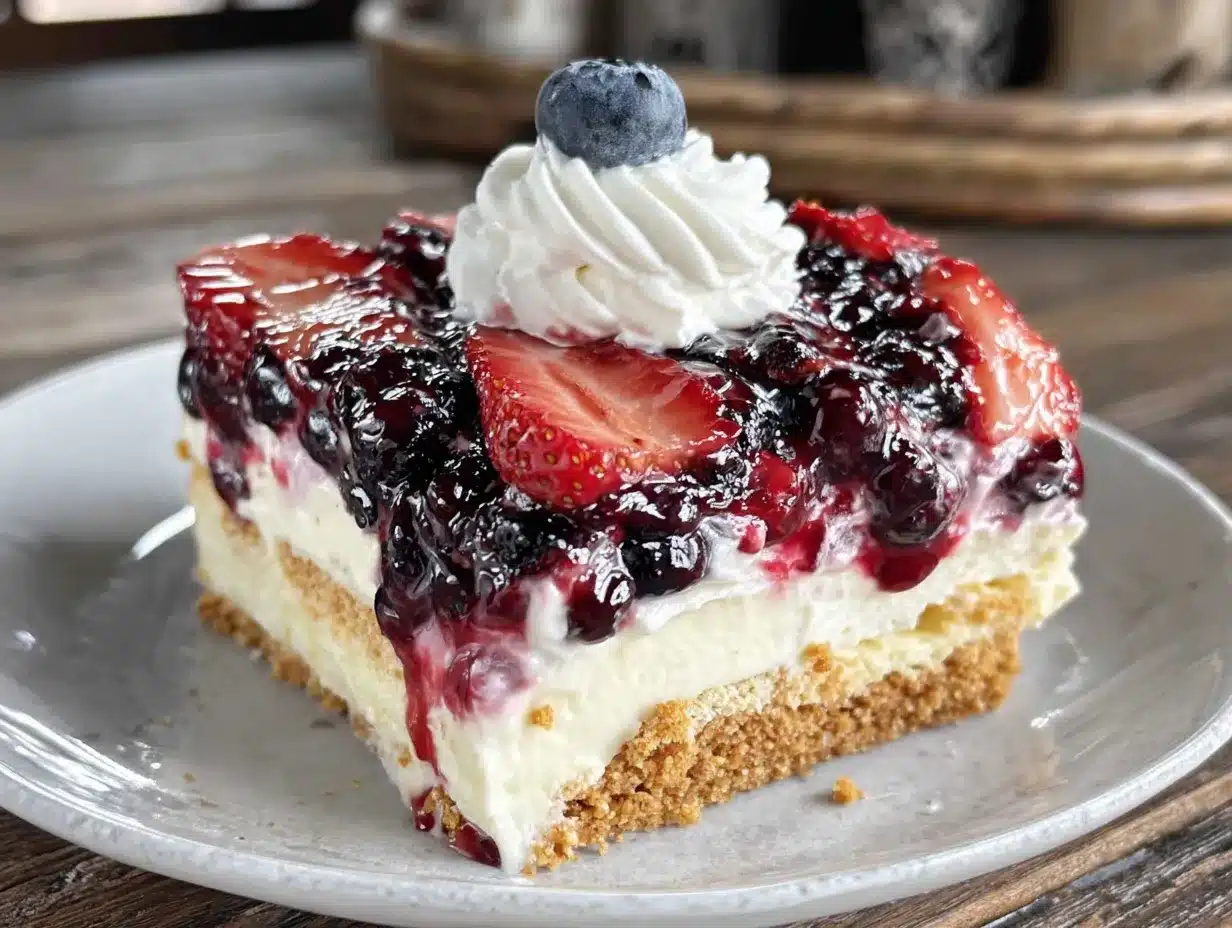
- 1 box (about 12 ounces) vanilla wafers (Nilla wafers are my go-to, but any brand works. You could also use graham crackers or shortbread cookies in a pinch.)
- 2 cups fresh strawberries, hulled and sliced (Look for bright red, firm berries. In summer, local strawberries are amazing here.)
- 1 1/2 cups fresh blueberries (Wild blueberries are smaller and sweeter, but regular ones work great too.)
- Optional: 1 tablespoon lemon zest (Adds a bright note that cuts through the richness. I love it, but my kids prefer it without.)
For the Topping
- Extra whipped cream (Reserve about 1 cup of the cream mixture before layering, or make a little extra.)
- Fresh berries for garnish (A few whole strawberries and a handful of blueberries make it look gorgeous.)
- Optional: Blue food coloring (A tiny drop in part of the whipped cream makes the blue stripe pop. Totally optional, but fun for holidays.)
One thing I learned the hard way—make sure your cream cheese is truly softened. If it’s too cold, you’ll end up with little white lumps in your filling. Not the end of the world, but the texture won’t be as smooth. Set it out early, and you’ll be golden.
For the berries, fresh is best here. Frozen berries release too much liquid as they thaw and can make the cookies soggy. If you absolutely must use frozen, thaw and drain them well first, then pat them dry with paper towels.
Equipment Needed
You don’t need much for this recipe, which is part of the beauty. Here’s what you’ll want to have on hand:
- 9×13-inch baking dish or similar (Glass or ceramic works best. You can see the layers through the sides, which looks pretty. A metal pan works too, but you won’t get the visual effect.)
- Electric mixer (Hand mixer or stand mixer both work. You could whip the cream by hand with a whisk, but your arm will get tired. Trust me, I’ve done it.)
- Large mixing bowl (For the cream cheese mixture. Make sure it’s big enough to hold everything without splashing.)
- Spatula (A rubber spatula helps spread the cream mixture evenly. A regular spoon works, but it’s messier.)
- Sharp knife and cutting board (For slicing the strawberries. A dull knife will squish them.)
- Measuring cups and spoons (For accuracy, especially with the powdered sugar.)
If you don’t have a 9×13 dish, you can use a 8×8 pan and make a smaller, taller cake. Just adjust the layers accordingly. I’ve also used a deep pie dish in a pinch, and it turned out fine—just fewer layers.
For the mixer, I use my trusty KitchenAid stand mixer, but my old hand mixer from college worked perfectly for years. Don’t feel like you need fancy equipment. A bowl and a whisk will get the job done, even if it takes a little longer.
Preparation Method
Let me walk you through this step by step. I’ve made this cake enough times to know where things can go wrong, so I’ll share those little tips along the way.
- Soften the cream cheese. Take the cream cheese out of the fridge about 30 minutes before you start. You want it at room temperature so it blends smoothly. If you forgot (I do this all the time), microwave it in 10-second bursts until it’s soft but not hot.
- Make the cream cheese base. In a large mixing bowl, beat the softened cream cheese with an electric mixer on medium speed until it’s smooth and fluffy, about 2 minutes. Scrape down the sides of the bowl with a spatula. Add the powdered sugar and vanilla extract, then beat again until everything is combined. The mixture should look light and creamy, with no lumps.
- Whip the heavy cream. In a separate bowl (or the same bowl if you want to wash it), pour in the cold heavy cream. Using clean beaters, whip the cream on medium-high speed until soft peaks form. This takes about 3-4 minutes. You’ll know it’s ready when the cream holds its shape when you lift the beaters, but it’s still soft and billowy. Don’t over-whip, or you’ll end up with butter. I learned that one the hard way.
- Fold it all together. Gently fold the whipped cream into the cream cheese mixture. Use a spatula and a gentle hand—stir in one direction, scraping the bottom and sides. You want to keep as much air in the mixture as possible. The final texture should be light, creamy, and spreadable. If it looks curdled or separated, you probably over-mixed. It’ll still taste fine, just not as fluffy.
- Prep the berries. While the cream mixture rests, wash and slice your strawberries. Remove the green tops and slice them into even pieces, about 1/4 inch thick. Rinse the blueberries and pat them dry with a clean kitchen towel or paper towels. Wet berries will make the cake soggy, so take the extra minute to dry them.
- Start layering. Spread a thin layer of the cream mixture (about 1/2 cup) on the bottom of your 9×13 dish. This helps the first layer of cookies stick and prevents them from sliding around. Then arrange a single layer of vanilla wafers over the cream. Don’t overlap them too much—just a snug fit with tiny gaps.
- Add the first fruit layer. Sprinkle about 1/3 of the sliced strawberries and 1/3 of the blueberries evenly over the cookies. Then spread about 1/3 of the remaining cream mixture over the berries. Use the spatula to spread it gently, being careful not to disturb the cookies underneath.
- Repeat the layers. Add another layer of vanilla wafers on top of the cream. Repeat with another third of the berries and another third of the cream. Then do it one more time. You should end with a final layer of cream on top. The dish should be full, with the cream reaching the top edge.
- Chill the cake. Cover the dish with plastic wrap or aluminum foil and refrigerate for at least 6 hours, but overnight is much better. The cookies need time to soften and absorb the cream. I know it’s tempting to dig in early, but the texture just isn’t the same after only a few hours. Trust the process.
- Garnish and serve. Before serving, spread the reserved whipped cream on top (if you set some aside). Arrange fresh strawberries and blueberries in a decorative pattern—I like to make stripes or a flag pattern for holidays. Slice and serve cold. Use a sharp knife and wipe it clean between cuts for neat slices.
The first time I made this, I rushed the chilling step and ended up with crunchy cookies that didn’t soften properly. It was still edible, but not the creamy, melt-in-your-mouth texture I was after. Give it the full overnight rest, and you’ll be rewarded with a dessert that slices like a dream.
Cooking Tips & Techniques
Over the years, I’ve picked up a few tricks that make this recipe even better. Some came from trial and error, others from watching my neighbor Margie work her magic. Here’s what I’ve learned:
Don’t skip the cream cheese. I know some icebox cake recipes just use whipped cream, but the cream cheese adds structure and flavor. It keeps the layers from sliding around and gives the filling a slight tang that balances the sweet cookies and berries. If you want a lighter version, use Neufchâtel cream cheese (the kind in the silver wrapper). It has less fat but still works beautifully.
Whip the cream to soft peaks, not stiff peaks. Soft peaks mean the cream holds a shape but still droops slightly when you lift the beaters. Stiff peaks are more stable, but they can make the filling feel a little dense. Soft peaks give you that light, airy texture that makes icebox cakes so addictive.
Let the cake rest overnight. I cannot stress this enough. The cookies need time to absorb moisture from the cream and soften into a cake-like texture. After 6 hours, they’re still a little firm. After 12-24 hours, they’re perfectly soft and tender. The flavors also meld together overnight, so the whole thing tastes more cohesive.
Use a serrated knife for slicing. A sharp serrated knife cuts through the cookies and cream without squishing the layers. A regular chef’s knife works, but it tends to push the filling out. I learned this after making a few messy slices that looked more like pudding than cake.
Keep it cold until serving. This cake needs to stay chilled. If it sits out at room temperature for more than 30 minutes, the cream will start to soften and the layers may slide. For picnics or potlucks, transport it in a cooler and add ice packs around the dish.
One mistake I made early on was using too many cookies per layer. I thought more cookies would make it more substantial, but it just made the cake dry. Stick with a single snug layer of cookies. The cream-to-cookie ratio is what makes this recipe work.
Variations & Adaptations
One of the best things about this Easy Red White and Blueberry No-Bake Icebox Cake is how flexible it is. I’ve tried several variations over the years, and they’ve all been delicious. Here are some ideas to make it your own:
Berry Swap: Not a fan of strawberries? Use raspberries or blackberries instead. You can also use all blueberries for a monochromatic look. In the fall, I’ve made this with sliced peaches and blackberries, and it was amazing. Just avoid super watery fruits like watermelon or citrus—they’ll make the cookies soggy.
Cookie Options: Vanilla wafers are classic, but graham crackers, shortbread cookies, or even thin ginger snaps work well. Lemon cookies add a nice citrus note. For a chocolate version, use chocolate wafer cookies and swap the berries for raspberries. The combination of chocolate and raspberries is incredible.
Dairy-Free Version: Use dairy-free cream cheese (like Kite Hill or Tofutti) and coconut cream instead of heavy cream. Chill the can of coconut cream overnight, then scoop out the solid part and whip it. It won’t be as fluffy as dairy cream, but it works. The flavor is slightly coconutty, which pairs well with the berries.
Lower Sugar Option: Cut the powdered sugar in the cream cheese mixture down to 1/4 cup. The cookies and berries add plenty of sweetness on their own. You can also use a sugar substitute like monk fruit sweetener, but I haven’t tested that myself, so proceed with caution.
Individual Servings: Instead of a big dish, layer everything in small mason jars or clear cups. This is perfect for parties or picnics. Just alternate cookies, cream, and berries until the jar is full, then chill. Each person gets their own little cake, and there’s no slicing involved.
I once made a version with lemon zest mixed into the cream cheese layer, and it was so bright and refreshing. My husband said it tasted like summer in a bowl. I’ve also added a splash of almond extract to the cream for a subtle nutty flavor. Don’t be afraid to experiment—this recipe is forgiving.
Serving & Storage Suggestions
This cake is best served cold, straight from the fridge. The texture is firm but creamy, and the flavors are fully developed after an overnight rest. Here’s how to serve and store it:
Serving Temperature: Pull the cake out of the fridge about 10-15 minutes before serving. This takes the chill off just enough so the flavors shine. Any longer, and the cream will start to soften too much. For a dramatic presentation, garnish with extra whipped cream and a few whole strawberries on top.
What to Serve With It: This cake is rich enough to stand alone, but it pairs beautifully with a cup of coffee or iced tea. For a full summer spread, serve it alongside grilled chicken, corn on the cob, and a crisp green salad. It’s also perfect after a heavy meal—the lightness of the cream and berries feels refreshing.
Storing Leftovers: Cover the dish tightly with plastic wrap or transfer slices to an airtight container. The cake will keep in the refrigerator for up to 3 days. After that, the cookies start to break down too much, and the texture becomes mushy. I’ve never had leftovers last longer than 2 days in my house, though.
Freezing Instructions: You can freeze this cake for up to 1 month. Assemble it completely, but don’t add the garnish. Cover tightly with plastic wrap and then foil. Thaw in the refrigerator overnight before serving. The texture will be slightly softer after freezing, but it’s still delicious. I don’t recommend freezing leftovers that have already been sliced—they’ll get icy and watery.
Flavor Development: The flavors actually improve after a day in the fridge. The cookies absorb the cream, the berries release a little juice, and everything melds together. Day two is usually the sweet spot. By day three, the texture starts to decline, but the flavor is still great.
Nutritional Information & Benefits
Here’s a rough estimate of the nutritional content per serving (based on 12 servings):
| Nutrient | Amount Per Serving |
|---|---|
| Calories | 385 |
| Total Fat | 24g |
| Saturated Fat | 14g |
| Cholesterol | 75mg |
| Sodium | 210mg |
| Total Carbohydrates | 38g |
| Dietary Fiber | 2g |
| Sugars | 24g |
| Protein | 4g |
This dessert does have sugar and fat, but it’s not all empty calories. The strawberries and blueberries are packed with antioxidants, vitamin C, and fiber. Blueberries, in particular, are known for their anti-inflammatory properties. The cream cheese and heavy cream provide calcium and protein, though in moderation.
If you’re watching your sugar intake, you can reduce the powdered sugar in the cream layer or use a sugar substitute. The berries provide natural sweetness, so you won’t miss the extra sugar as much as you think.
This recipe contains dairy and gluten (from the cookies). For a gluten-free version, use gluten-free vanilla wafers or graham crackers. For a dairy-free version, follow the substitutions I mentioned earlier. As always, check your ingredient labels if you have specific allergies.
I personally love that this dessert feels indulgent but still includes real, whole ingredients. It’s not a health food by any means, but it’s a far cry from processed, pre-packaged desserts. And honestly, sometimes you just need a little something sweet and creamy. That’s okay.
Conclusion
This Easy Red White and Blueberry No-Bake Icebox Cake is the dessert I turn to again and again. It’s simple enough for a Tuesday night but beautiful enough for a holiday party. The layers of creamy filling, soft cookies, and fresh berries never get old. Every time I make it, someone asks for the recipe. And every time, I think of Margie standing in her kitchen, showing me that you don’t need to be a pastry chef to make something memorable.
What I love most about this recipe is how forgiving it is. You can swap the berries, change the cookies, adjust the sweetness—it always works. It’s the kind of recipe that invites you to make it your own. And isn’t that what cooking is all about? Taking something simple and adding your own touch?
I hope you give this recipe a try. Whether you’re making it for a backyard barbecue, a potluck, or just because you want a cold treat on a hot day, I think you’ll love it. And when you do, I’d love to hear about it. Leave a comment below and tell me how it turned out. Did you add your own twist? Did your family love it? Share your photos and stories—I read every single one.
Thanks for stopping by, friend. Now go make something delicious.
Frequently Asked Questions
Can I use frozen berries instead of fresh?
You can, but fresh berries work much better. Frozen berries release a lot of liquid as they thaw, which can make the cookies soggy and the cream watery. If you must use frozen, thaw them completely and pat them very dry with paper towels before layering.
How long does this cake need to chill?
At least 6 hours, but overnight is ideal. The cookies need time to soften and absorb the cream. After 6 hours, they’ll still be a little firm. After 12-24 hours, the texture is perfectly soft and cake-like. Don’t rush this step.
Can I make this cake in advance?
Absolutely. This is a great make-ahead dessert. Assemble it the day before your event, cover it tightly, and refrigerate. The flavors actually improve overnight. Just add the garnish right before serving for the prettiest presentation.
What can I use instead of vanilla wafers?
Graham crackers, shortbread cookies, lemon cookies, or even thin ginger snaps all work well. For a chocolate version, use chocolate wafer cookies. Just avoid thick cookies like Oreos (unless you crush them) because they won’t soften properly.
Can I freeze this icebox cake?
Yes, you can freeze it for up to 1 month. Assemble the cake completely but don’t add the garnish. Wrap it tightly in plastic wrap and then foil. Thaw in the refrigerator overnight before serving. The texture will be slightly softer after freezing, but it’s still delicious.
Pin This Recipe!
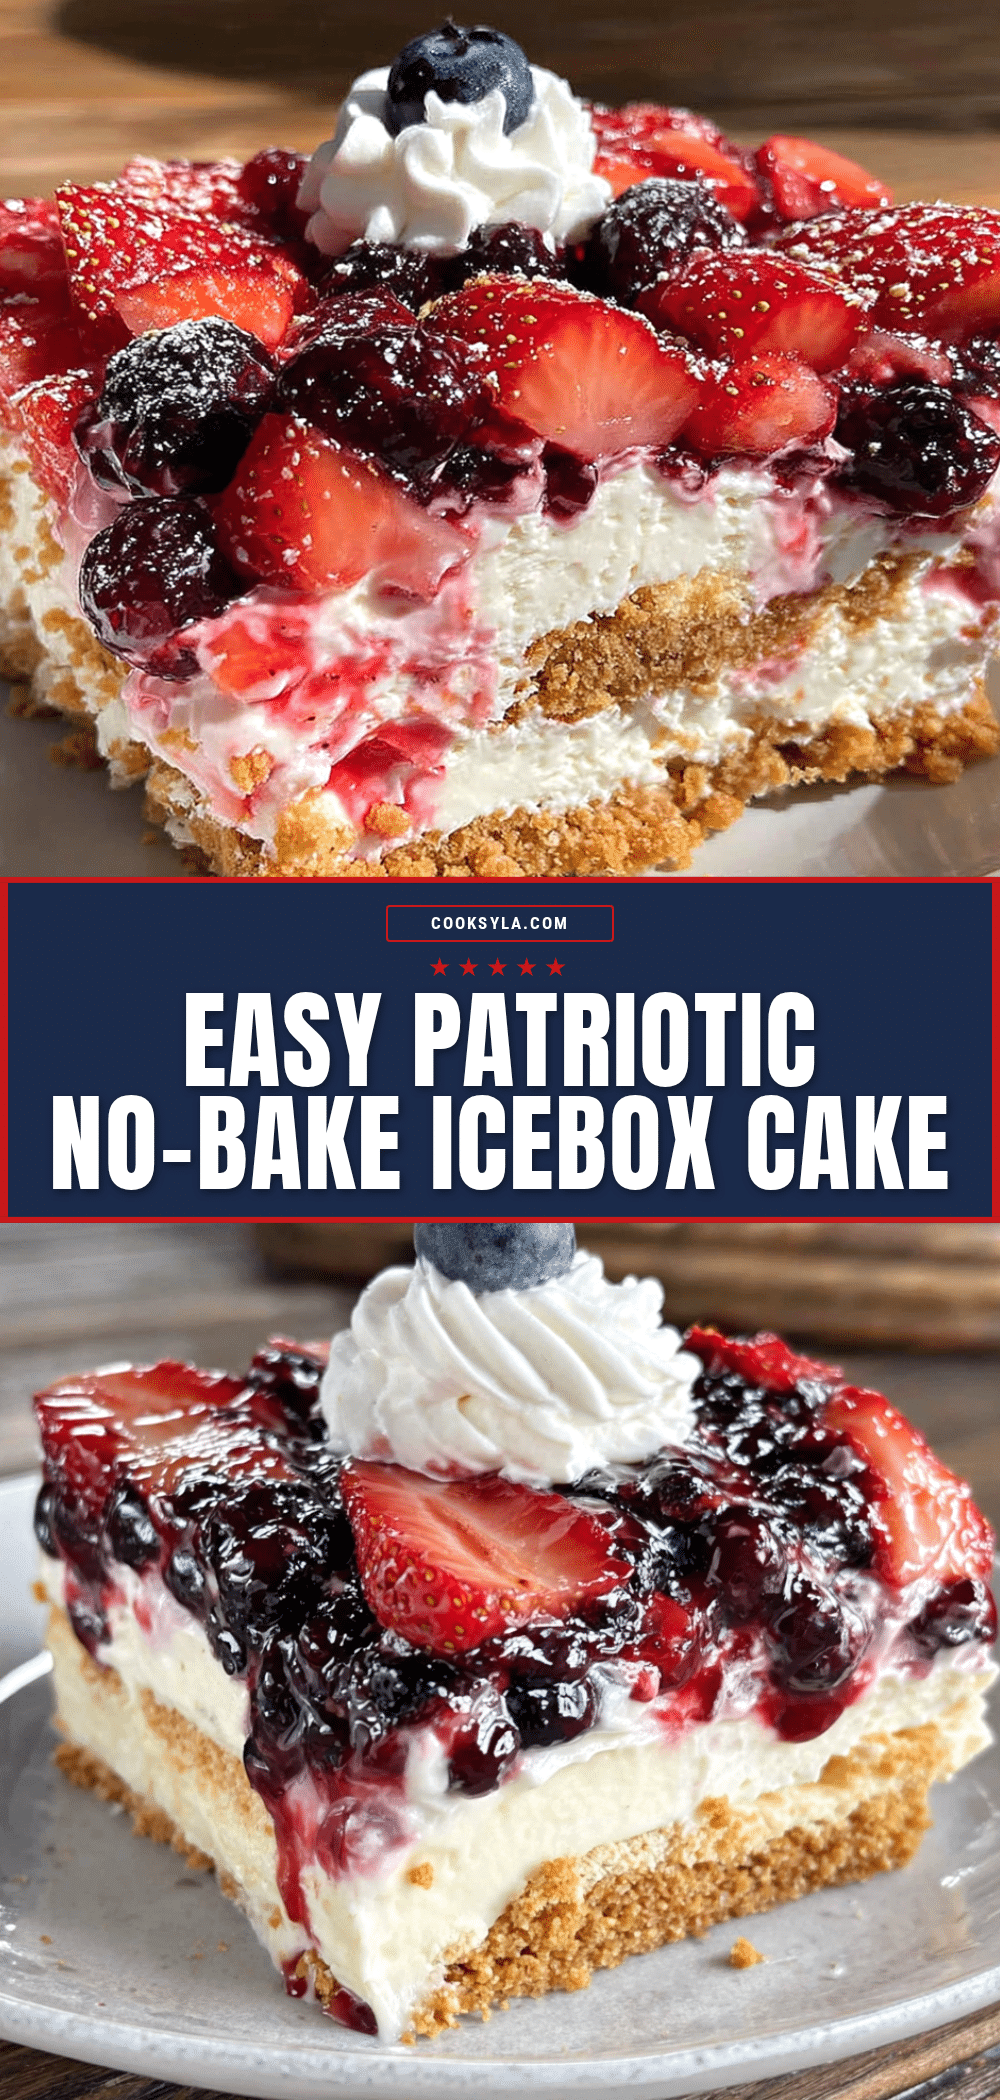
Easy Red White and Blueberry No-Bake Icebox Cake
A stunning no-bake dessert with layers of vanilla wafers, cream cheese whipped cream, and fresh strawberries and blueberries. Perfect for patriotic holidays or any summer gathering, this icebox cake comes together in minutes and chills to perfection.
- Prep Time: 15 minutes
- Cook Time: 0 minutes
- Total Time: 6 hours 15 minutes (includes chilling)
- Yield: 12 servings 1x
- Category: Dessert
- Cuisine: American
Ingredients
- 8 ounces cream cheese, softened
- 1/2 cup powdered sugar
- 1 teaspoon vanilla extract
- 2 cups heavy whipping cream
- 1 box (about 12 ounces) vanilla wafers
- 2 cups fresh strawberries, hulled and sliced
- 1 1/2 cups fresh blueberries
- Optional: 1 tablespoon lemon zest
- Extra whipped cream for topping
- Fresh berries for garnish
- Optional: Blue food coloring
Instructions
- Soften the cream cheese by letting it sit at room temperature for 30 minutes.
- In a large mixing bowl, beat the softened cream cheese with an electric mixer on medium speed until smooth and fluffy, about 2 minutes. Scrape down the sides.
- Add the powdered sugar and vanilla extract, then beat until combined and creamy.
- In a separate bowl, pour in the cold heavy cream. Whip on medium-high speed until soft peaks form, about 3-4 minutes.
- Gently fold the whipped cream into the cream cheese mixture using a spatula until light and creamy.
- Wash and slice the strawberries into 1/4-inch thick pieces. Rinse and pat dry the blueberries.
- Spread a thin layer (about 1/2 cup) of the cream mixture on the bottom of a 9×13-inch baking dish.
- Arrange a single snug layer of vanilla wafers over the cream.
- Sprinkle about 1/3 of the sliced strawberries and 1/3 of the blueberries evenly over the cookies.
- Spread about 1/3 of the remaining cream mixture over the berries.
- Repeat layers: another layer of vanilla wafers, another third of the berries, and another third of the cream.
- Repeat one more time, ending with a final layer of cream on top.
- Cover the dish with plastic wrap or foil and refrigerate for at least 6 hours, preferably overnight.
- Before serving, spread reserved whipped cream on top and garnish with fresh berries in a decorative pattern.
- Slice and serve cold, using a sharp knife wiped clean between cuts.
Notes
Make sure cream cheese is truly softened to avoid lumps. Fresh berries are best; frozen berries release too much liquid. Chill overnight for best texture. Use a serrated knife for clean slices. Keep cake chilled until serving.
Nutrition
- Serving Size: 1 slice (1/12 of cak
- Calories: 385
- Sugar: 24
- Sodium: 210
- Fat: 24
- Saturated Fat: 14
- Carbohydrates: 38
- Fiber: 2
- Protein: 4
Keywords: no-bake icebox cake, red white and blue dessert, Fourth of July dessert, summer dessert, berry dessert, easy dessert, no-bake cake


